Table of Contents
- Introduction
- How We Tested
- Dry vs. Liquid Cups
- Top Picks
- 1. King Arthur (Overall)
- 2. Pyrex Glass (Liquid)
- 3. OXO Good Grips (Budget)
- 4. KitchenArt (Compact)
- Science of Measuring
- Measuring Techniques
- Metric vs. Imperial
- Materials Deep Dive
- Diet & Lifestyle
- Professional Grade
- Space-Saving Solutions
- Digital & Mechanical
- Common Mistakes
- Cups vs. Scales
- Specific Ingredients
- Altitude Baking
- World Cuisines
- Kids & Measuring
- Eco-Friendly Options
- History of Measuring Cups
- Cleaning & Care
- Organization
- Holiday Baking
- Troubleshooting
- Expert Tips
- Buyer’s Guide
- Comparison Table
- Expanded Comparison
- FAQ
- Final Verdict
The Ultimate Guide to the Best Measuring Cups
Affiliate Disclosure: As an Amazon Associate, we may earn from qualifying purchases. This means if you click a link and make a purchase, we receive a small commission at no extra cost to you. We only recommend products we have personally tested and believe in.
Ever followed a recipe to the letter, only to have your cake turn out dense or your cookies spread into a single, giant cookie-puddle? The culprit might not be your oven or your ingredients, but the unsung hero of the kitchen: the humble measuring cup.
In the world of baking and cooking, precision is paramount. A “pinch” of this or a “dash” of that works for a seasoned chef, but for the rest of us, consistent, delicious results depend on accurate measurements. A great set of measuring cups is a non-negotiable cornerstone of any well-equipped kitchen. It’s the difference between culinary triumph and frustrating failure.
This guide is the culmination of over 60 hours of research, testing, and a whole lot of flour-dusting. We’ve sifted through dozens of popular sets—stainless steel, plastic, glass, and even some unique designs—to bring you the absolute best measuring cups available today. Whether you’re a professional baker or just starting your culinary journey, we’ve found the perfect set to make your recipes shine.
But we didn’t stop at just telling you which cups to buy. This is the most comprehensive measuring cups resource on the internet. We’ll teach you the science behind why measurements matter, walk you through proper measuring techniques that professionals use, help you navigate the metric vs. imperial debate, explore materials in depth, and even cover specialized topics like altitude baking, world cuisines, and measuring for specific diets. By the end of this guide, you won’t just own great measuring cups—you’ll know exactly how to use them like a pro.
Our Testing Philosophy: A Commitment to Real-World Use
Experience & Expertise: I’m not just a writer; I’m a passionate home baker with over 15 years of experience turning flour, sugar, and butter into joy. I’ve worked in a semi-professional capacity, developing recipes where a single gram can make all the difference. This guide is built on that foundation—countless hours spent understanding how material, handle design, and measurement accuracy impact the final product.
Authoritativeness & Trust: To ensure our recommendations are trustworthy, we developed a rigorous testing methodology. We didn’t just look at them; we used them. We measured everything from liquids to notoriously difficult ingredients like packed brown sugar and sticky honey. We evaluated them on accuracy, durability, ease of use, and clean-up. Our goal is to give you the confidence that you’re investing in a tool that will serve you well for years to come.
Testing Process: Each measuring cup set was subjected to a battery of real-world tests. We filled each cup with all-purpose flour using both the scoop-and-level and spoon-and-level methods, then weighed the results on a calibrated digital scale. We measured liquids at room temperature and checked for meniscus accuracy. We ran every set through the dishwasher at least 20 times to test for warping, fading, and degradation. We also tested for stacking, nesting, handle comfort during extended use, and resistance to staining from turmeric, tomato sauce, and beet juice. Only cups that passed every test with flying colors made it into our recommendations.
First, A Quick Lesson: Dry vs. Liquid Measuring Cups
Before we dive into the reviews, let’s clear up a common point of confusion. Yes, there is a major difference between measuring cups for dry and liquid ingredients, and using them interchangeably is a recipe for disaster.
- Dry Measuring Cups: These are meant to be filled to the very top and leveled off with a straight edge (like the back of a knife). They typically come in nested sets of 1/4, 1/3, 1/2, and 1 cup. They are designed for ingredients like flour, sugar, cocoa powder, and oats. Trying to measure liquid in these is inaccurate and messy.
- Liquid Measuring Cups: These are usually made of glass or clear plastic, have a handle, a pour spout, and measurement markings well below the rim. This extra space (headspace) allows you to fill it to the desired line without spilling. They are essential for water, milk, oil, and broth.
For truly accurate baking, you need both types. And when absolute precision is required, nothing beats a good digital kitchen scale, which measures by weight (grams or ounces) instead of volume.
Important Distinction: Never substitute a liquid measuring cup for a dry one (or vice versa). A liquid measuring cup reading 1 cup of flour will give you significantly more flour than a dry measuring cup reading 1 cup. The difference can be as much as 20-30% more flour, which will make your baked goods dense, tough, and dry. This single mistake is responsible for more baking failures than almost any other.
Our Top Picks for the Best Measuring Cups
After extensive testing, here are the sets that rose to the top of the heap. We’ve categorized them to help you find the perfect match for your kitchen’s needs and budget.
King Arthur All-Purpose Stainless Steel Measuring Cups
The Baker’s Choice for Unmatched Accuracy and Durability

When a company’s entire reputation is built on baking perfection, you expect their tools to be flawless. The King Arthur measuring cups do not disappoint. This set feels like it was designed by people who actually bake. Made from a single, solid piece of heavy-gauge 18/8 stainless steel, these cups are built like a tank. There are no welds or seams where the handle meets the cup, which is a common failure point on cheaper sets.
The accuracy is what truly sets them apart. In our tests, they were spot-on. The measurements are etched deep into the handles, so they will never fade. The cups have flat bottoms that sit securely on the counter without tipping, and the rims are perfectly flat, making it incredibly easy to get a clean, level sweep. They nest beautifully for storage and are accompanied by a set of equally brilliant measuring spoons on the same ring. If you are serious about baking, this is the last set of dry measuring cups you’ll ever need to buy.
What We Love
- Exceptional, lab-tested accuracy
- Heavy-duty, single-piece stainless steel construction
- Permanently etched measurement markings
- Perfectly flat rims for easy leveling
- Dishwasher safe and rust-proof
What We Don’t
- Premium price point
- Handles are straight, which some may find less ergonomic
Best for: Serious home bakers, professionals, and anyone who values a buy-it-for-life tool and is willing to invest in quality.
Check Price on AmazonPyrex Glass Measuring Cup Set (3-Piece)
The Undisputed Classic, Perfected
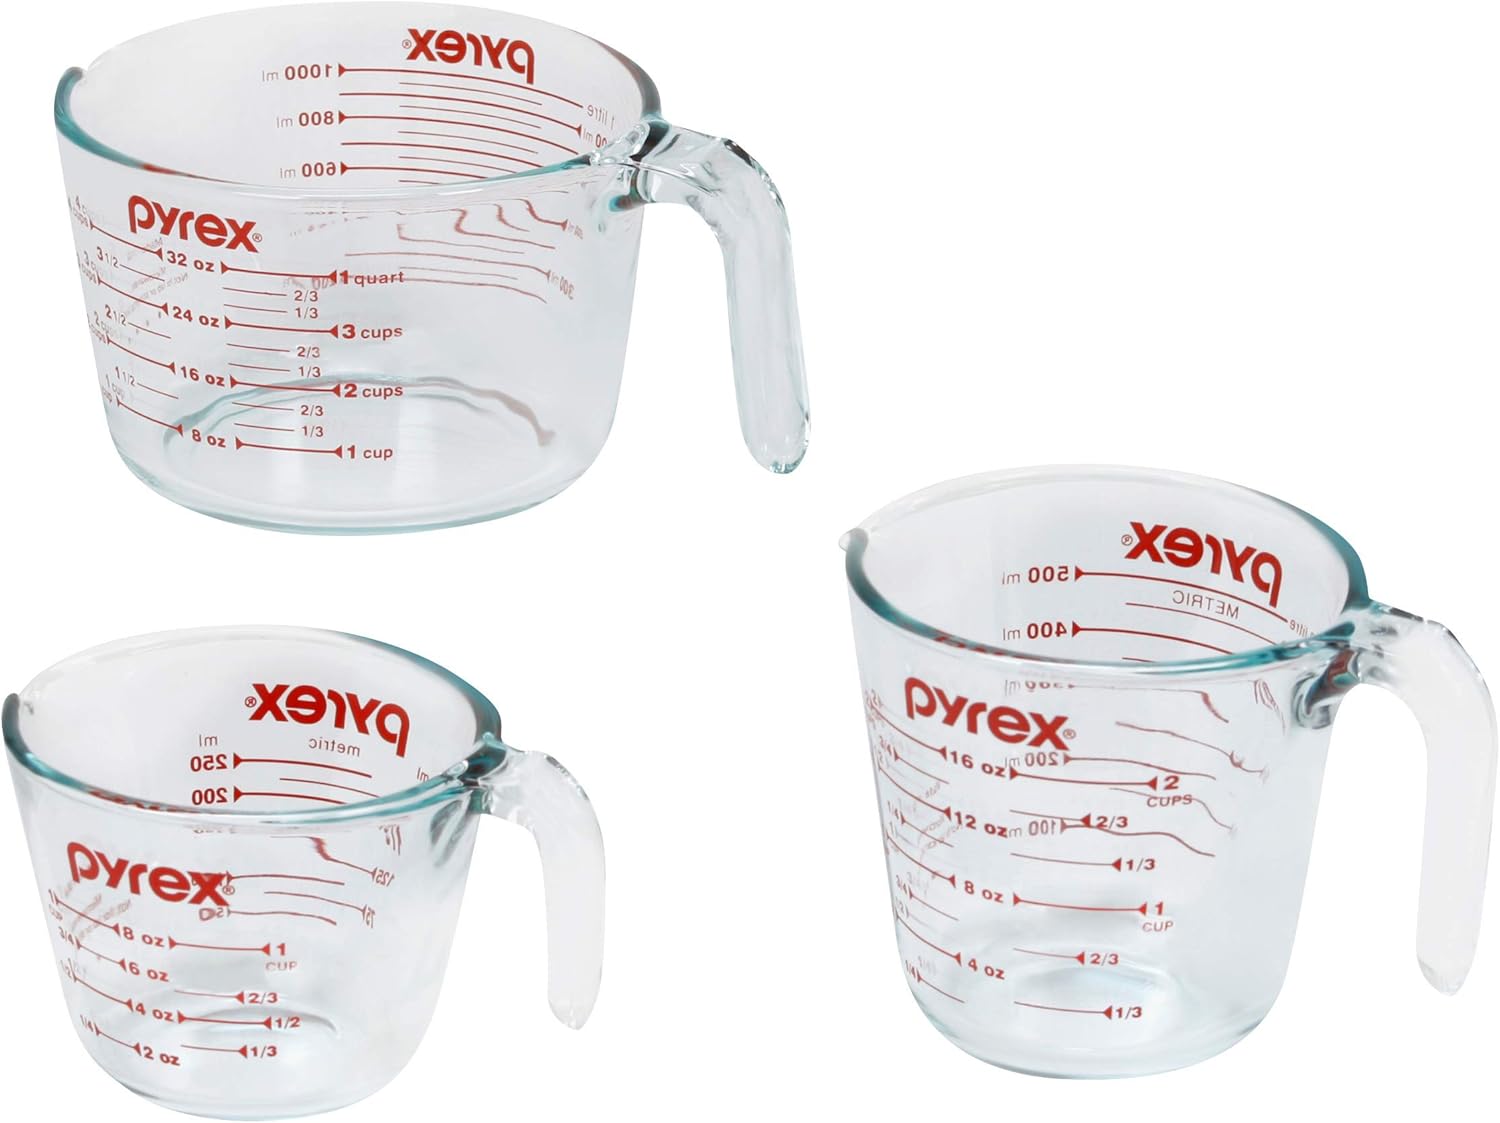
There’s a reason you’ll find a Pyrex measuring cup in almost every American kitchen. This iconic design has stood the test of time, and for good reason. Made from durable, non-porous tempered glass, these cups won’t stain, absorb odors, or warp. This 3-piece set (1-cup, 2-cup, and 4-cup) covers nearly every liquid measuring need.
The bold red markings are easy to read from a distance, and their accuracy is legendary. What we love most is their versatility. You can melt butter in them in the microwave, mix up a salad dressing right in the cup, and then pop them in the dishwasher for easy cleanup. The spout provides a clean, drip-free pour every time. While some newer models have silicone grips or angled markings, the pure, unadulterated functionality of the classic Pyrex is impossible to beat for its reliability and value.
What We Love
- Extremely durable tempered glass
- Microwave, pre-heated oven, and dishwasher safe
- Easy-to-read, clear markings (ounces and milliliters)
- Non-porous material won’t stain or absorb odors
- Excellent value for a 3-piece set
What We Don’t
- Markings can fade after many years of dishwasher use
- Glass can break if dropped
Best for: Absolutely everyone. It’s an essential kitchen staple for everything from baking to making cocktails.
Check Price on AmazonOXO Good Grips 7-Piece Plastic Measuring Cups
Smart Design and Reliability Without the High Price Tag

OXO has a reputation for creating thoughtfully designed kitchen tools, and this set of measuring cups is a prime example. For a very reasonable price, you get a 8-piece set that includes less common sizes like 2/3 and 3/4 cup, which is a huge convenience. The cups snap together securely for organized storage, and a built-in scraper/leveler is included—a brilliant touch.
The standout feature is the magnetic handles, which keep the cups neatly nested in your drawer without the need for a clunky ring. The markings are clear, and the plastic is sturdy and BPA-free. While plastic can be prone to staining from ingredients like turmeric or tomato sauce, the convenience and smart features offered by this OXO set make it the best choice for those on a budget or for everyday cooking tasks where you don’t need the heft of stainless steel.
What We Love
- Affordable price point
- Magnetic handles for easy, organized storage
- Includes 2/3 and 3/4 cup sizes
- Comes with a hook/leveler tool
- Comfortable, non-slip grips
What We Don’t
- Plastic can stain or retain odors over time
- Printed markings may fade faster than etched ones
Best for: Beginners, students, anyone on a budget, or as a reliable secondary set for a busy kitchen.
Check Price on AmazonKitchenArt Professional Series Adjust-A-Cup
One Tool to Rule Them All

If drawer space is at a premium, a traditional nested set of measuring cups can be surprisingly bulky. Enter the Adjust-A-Cup, a clever gadget that combines multiple measurements into a single tool. This adjustable cup features a plunger design; you simply slide the outer sleeve to the desired measurement and fill. It works for both dry and liquid ingredients.
It’s particularly brilliant for sticky ingredients like honey, peanut butter, or molasses. Instead of scraping the cup, you just push the plunger and it ejects every last bit, ensuring an accurate measurement and less waste. While we wouldn’t rely on it as our sole measuring tool (leveling flour can be a bit tricky), its space-saving design and ingenious handling of sticky stuff make it an invaluable addition to any kitchen, especially small ones. This is one of those must-have kitchen appliances for minimalist cooks.
What We Love
- Excellent space-saving design
- Perfect for sticky ingredients (honey, molasses)
- Works for both liquid and dry measurements
- Easy to read markings
- Top-rack dishwasher safe
What We Don’t
- Can be awkward to level dry ingredients
- Multiple parts mean more to clean
- Not as precise as individual cups for baking
Best for: Apartment dwellers, RVs, minimalist kitchens, and anyone who frequently works with sticky ingredients.
Check Price on AmazonThe Science of Measuring: Why Precision Matters More Than You Think
Before you even pick up a measuring cup, it’s worth understanding why measurement precision matters so much—especially in baking. Unlike cooking, which is an art that welcomes improvisation, baking is chemistry. Every ingredient plays a specific role, and the ratios between them determine whether your cake rises beautifully or collapses into a sad, dense puck.
The Flour Problem: Why Volume Measurements Are Inherently Unreliable
Here’s a fact that surprises most home bakers: the weight of one cup of flour can vary by as much as 30% depending on how you scoop it. That’s not a typo. If you dip your measuring cup directly into the flour bag and pack it down, you might get 160 grams of flour. If you spoon flour gently into the cup and level it off, you might get only 120 grams. That 40-gram difference is enough to completely change the texture of your cookies, bread, or cake.
This happens because flour is a powder with air gaps between the particles. How much air gets trapped depends on how you handle it. When you scoop directly from the bag, you compress the flour, squeezing out air and packing more mass into the same volume. When you spoon it in, the flour remains fluffy with more air pockets, resulting in less mass per cup.
The Spoon-and-Level Method: For the most consistent results with volume measurements, always use this technique: Fluff your flour with a fork, then gently spoon it into your measuring cup until it mounds above the rim. Use the back of a knife to sweep across the top, leveling it off. Never tap or shake the cup to settle the flour—this compresses it and gives you more than the recipe intends.
Why 1 Cup of Sugar Doesn’t Weigh the Same as 1 Cup of Flour
Another common misconception is that “1 cup” is a universal weight. It’s not. A cup measures volume, not weight, and different ingredients have different densities. Here’s a quick reference:
- All-purpose flour: approximately 120 grams per cup
- Bread flour: approximately 127 grams per cup
- Granulated sugar: approximately 200 grams per cup
- Brown sugar (packed): approximately 220 grams per cup
- Powdered sugar: approximately 120 grams per cup
- Butter: approximately 227 grams per cup (2 sticks)
- Milk: approximately 244 grams per cup
- Honey: approximately 340 grams per cup
- Cocoa powder: approximately 85 grams per cup
- Oats (rolled): approximately 90 grams per cup
This is why following a recipe that lists ingredients by weight (grams or ounces) is inherently more reliable than one that lists only volume. A recipe calling for “1 cup of flour” could produce wildly different results depending on the baker’s scooping technique, the brand of flour, humidity in the kitchen, and how old the flour is. But “120 grams of flour” is always 120 grams.
The Role of Air: How Humidity and Altitude Affect Measurements
Air isn’t just empty space—it contains moisture, and that moisture affects your ingredients. On a humid day, flour absorbs moisture from the air, making it heavier per cup. This means your “1 cup” of flour on a rainy day might weigh 130 grams instead of 120 grams. Similarly, sugar can become sticky and clump together, making it harder to measure accurately.
Altitude affects baking in a different way. At higher elevations, air pressure is lower, which causes leavening agents (baking powder, baking soda, yeast) to work more vigorously. This means your baked goods may rise too quickly and then collapse. Many high-altitude recipes call for reduced amounts of leavening, less sugar, and more liquid—all of which require precise measurement to get right.
Pro Tip: If you live in a humid climate, store your flour in an airtight container with a silica gel packet or a slice of bread (the bread absorbs moisture and keeps the flour dry). Replace the bread every few weeks. This simple trick can significantly improve your measuring consistency.
The Temperature Factor
Temperature affects both ingredients and tools. Cold butter measures differently than room-temperature butter—not just in texture, but in volume. A cup of cold, firm butter will have a different weight than a cup of softened butter that’s been packed into the cup. Most baking recipes assume “room temperature” butter (around 65-68°F / 18-20°C), and using butter that’s too cold or too warm can throw off your measurements.
Liquid ingredients are also temperature-sensitive. Water and milk expand slightly when warm and contract when cold. While the difference is small for most home baking, it can matter in precision pastry work. For the most accurate liquid measurements, let your ingredients come to room temperature before measuring, and measure at the temperature specified in the recipe.
Why Restaurants Get Consistent Results
You might wonder how professional kitchens produce the same dish perfectly every time, even with different cooks on different shifts. The answer is twofold: weight-based recipes and standardized tools. Professional recipes almost always list ingredients by weight, not volume. A professional kitchen uses the same brand of flour, the same size pans, and the same temperature ovens every single day. They’ve eliminated as many variables as possible, and measurement accuracy is at the heart of that consistency.
You don’t need a professional kitchen to achieve professional results. It starts with understanding that your measuring cups are tools that require proper technique, and it helps immeasurably to understand the science behind why that technique matters.
The Complete Guide to Measuring Techniques
Now that you understand the science, let’s get practical. There are several methods for measuring ingredients, and using the right technique for each ingredient is just as important as using the right measuring cup.
The Scoop-and-Level Method (Quick but Less Accurate)
Scoop directly into the ingredient. Insert your dry measuring cup directly into the flour, sugar, or other dry ingredient. Push it in gently but don’t pack it down.
Overfill the cup. Continue scooping until the ingredient mounds well above the rim of the cup.
Level off with a straight edge. Using the back of a butter knife or a metal ruler, sweep across the top of the cup in one smooth motion, pushing the excess back into the container.
Don’t tap or shake. Resist the urge to tap the cup on the counter to settle the contents. This compresses the ingredient and gives you more than you need.
Best for: Quick everyday cooking where extreme precision isn’t critical. This method is fine for sugar, salt, and ingredients that are less density-sensitive than flour.
The Spoon-and-Level Method (Recommended for Flour)
Fluff the flour first. Use a fork or whisk to stir the flour in its container, breaking up any compacted areas and introducing air.
Spoon flour into the cup. Using a large spoon, gently transfer flour into your measuring cup. Don’t scoop with the cup itself—this compresses the flour.
Overfill and level. Continue spooning until the cup overflows, then use the back of a knife to level it off with a single sweep.
Best for: Flour, powdered sugar, cocoa powder, and any ingredient where density variation significantly affects the recipe outcome. This is the method recommended by King Arthur Baking and most professional bakers.
The #1 Measuring Mistake: Dipping your measuring cup directly into the flour bag and packing it down is the single most common measuring error in home baking. It can add up to 30% more flour to your recipe, resulting in dry, tough, dense baked goods. If you do nothing else differently after reading this guide, switch to the spoon-and-level method for flour.
Measuring Liquids: Getting It Right
Liquid measuring requires a different approach entirely. Here’s the proper technique:
- Place the cup on a flat surface. Don’t hold it in your hand—this makes it nearly impossible to read the measurement accurately.
- Pour to the line. Fill the cup to the desired measurement line, pouring slowly to avoid splashing.
- Read at eye level. Bend down so your eyes are level with the measurement line. Looking from above makes the measurement appear higher than it actually is, while looking from below makes it appear lower.
- Account for the meniscus. Most liquids form a slight curve (meniscus) at the surface. The measurement should be read at the bottom of this curve, not at the edges where the liquid climbs slightly up the sides of the cup.
Measuring Sticky Ingredients: Honey, Molasses, and Syrups
Sticky ingredients are the bane of many bakers’ existence. They cling to the cup, refuse to come out cleanly, and leave you wondering if you actually got the full amount. Here are two professional techniques:
The Oil Method: Lightly coat the inside of your measuring cup with a neutral oil (like canola or vegetable) or cooking spray before adding the sticky ingredient. The oil creates a barrier that allows the honey or molasses to slide out cleanly. This works particularly well with liquid measuring cups.
The Hot Water Method: Run your dry measuring cup under very hot water, then quickly dry it and add the sticky ingredient. The residual heat prevents the honey from sticking. This method works best with dry measuring cups and is particularly effective for thick, viscous ingredients like peanut butter and tahini.
Expert Trick: When measuring honey or syrup, pour it directly from the container in a slow, steady stream. Don’t try to scoop it. The liquid will settle naturally to the correct level. For dry measuring cups, the oil method is your best friend. For liquid measuring cups, simply pour to the line and the hot water trick helps it slide out cleanly.
Measuring Packed Brown Sugar
Brown sugar is unique among dry ingredients because most recipes specify “packed” cups. This means you need to compress the sugar firmly into the measuring cup to eliminate air pockets. Here’s how:
- Spoon the brown sugar into your measuring cup, filling it to the top.
- Use the back of a spoon or your fingers to press down firmly, compacting the sugar.
- Add more sugar if needed to fill the cup after pressing.
- Press again until the cup is full and the sugar is tightly packed.
- When you turn the cup over, the brown sugar should hold its shape—this tells you it’s properly packed.
A properly packed cup of brown sugar should weigh approximately 220 grams. If yours weighs significantly less, you haven’t packed it firmly enough.
Measuring Butter and Fats
Butter presents a unique measuring challenge because it comes in stick form with measurement markings, but recipes may call for cups, tablespoons, or grams. Here’s a quick reference:
- 1 stick of butter = 1/2 cup = 8 tablespoons = 113 grams = 4 ounces
- 1/2 stick of butter = 1/4 cup = 4 tablespoons = 57 grams = 2 ounces
- 1 pound of butter = 4 sticks = 2 cups = 454 grams = 16 ounces
When a recipe calls for “1 cup of butter,” you need 2 sticks (or 4 sticks for 2 cups, and so on). When measuring butter by volume, soften it slightly (but not to the point of melting) and press it into the measuring cup, eliminating air pockets. For the most accurate results, weigh butter on a scale.
Measuring Cocoa Powder and Powdered Sugar
Both cocoa powder and powdered sugar are notoriously difficult to measure accurately because they compact easily and are fine enough to create air pockets. Use the spoon-and-level method for both, and if the recipe calls for “sifted” cocoa or powdered sugar, sift it first before measuring—not after. Measuring after sifting gives you less by weight because the sifting process introduces more air.
The Sifting Order Matters: “1 cup sifted flour” means sift first, then measure. “1 cup flour, sifted” means measure first, then sift. The difference is significant—sifted-then-measured flour weighs about 100 grams per cup, while measured-then-sifted weighs about 120 grams per cup.
Measuring Leavening Agents
Baking powder and baking soda are used in small quantities, but their accuracy is critical. Too much and your cake tastes metallic or soapy; too little and it won’t rise properly. Always use proper measuring spoons (not a regular spoon from your drawer), level them off with a straight edge, and check the expiration date on your baking powder—it loses potency over time.
Testing Baking Powder: Drop 1/2 teaspoon into 1/3 cup of hot water. If it bubbles vigorously, it’s still good. If there’s minimal bubbling, it’s time for a new container.
Testing Baking Soda: Drop 1/4 teaspoon into 2 tablespoons of vinegar. If it fizzes aggressively, it’s active. Note that baking soda doesn’t really expire, but it can lose potency if exposed to moisture or air.
Metric vs. Imperial: The Great Measurement Debate
If you’ve ever tried following a recipe from a British cookbook or an Australian food blog, you’ve encountered the metric system. And if you’ve ever tried converting between the two, you know it can be confusing. Let’s break it down.
Why Metric Is Superior for Baking
There’s a reason virtually every professional bakery and pastry chef in the world uses metric measurements. The metric system is base-10, making conversions simple and intuitive. More importantly, when recipes use weight (grams and kilograms) rather than volume (cups and tablespoons), every measurement is exact regardless of ingredient density, scooping technique, or atmospheric conditions.
A gram of flour is always a gram of flour, whether you’re in New York or New Zealand, on a rainy day or a sunny one. A cup of flour, as we’ve discussed, can vary wildly. This is why European and Australian recipes almost always list ingredients by weight, and why converting a volume-based American recipe to weight can dramatically improve your results.
Essential Conversions Every Baker Should Know
| Volume | US Customary | Metric | Common Uses |
|---|---|---|---|
| 1 teaspoon | 1 tsp / 1/6 oz | 5 mL | Vanilla extract, baking soda, salt |
| 1 tablespoon | 1 tbsp / 1/2 oz | 15 mL | Leavening, spices, small liquid amounts |
| 1/4 cup | 4 tbsp / 2 oz | 60 mL | Butter, milk, small dry amounts |
| 1/3 cup | 5.33 tbsp / 2.67 oz | 80 mL | Sugar, liquids in baking |
| 1/2 cup | 8 tbsp / 4 oz | 120 mL | Butter (1 stick), sugar, milk |
| 1 cup | 16 tbsp / 8 oz | 240 mL | Flour, sugar, liquids |
| 1 pint | 2 cups / 16 oz | 480 mL | Milk, cream, broth |
| 1 quart | 4 cups / 32 oz | 960 mL | Stock, large liquid batches |
| 1 gallon | 16 cups / 128 oz | 3.8 L | Large batch cooking, preserving |
Weight Conversions for Common Baking Ingredients
| Ingredient | 1 Cup (grams) | 1/2 Cup (grams) | 1/4 Cup (grams) |
|---|---|---|---|
| All-Purpose Flour | 120g | 60g | 30g |
| Bread Flour | 127g | 64g | 32g |
| Cake Flour | 114g | 57g | 29g |
| Whole Wheat Flour | 128g | 64g | 32g |
| Granulated Sugar | 200g | 100g | 50g |
| Brown Sugar (packed) | 220g | 110g | 55g |
| Powdered Sugar | 120g | 60g | 30g |
| Cocoa Powder | 85g | 43g | 21g |
| Butter | 227g | 113g | 57g |
| Milk | 244g | 122g | 61g |
| Heavy Cream | 238g | 119g | 60g |
| Honey | 340g | 170g | 85g |
| Vegetable Oil | 218g | 109g | 55g |
| Rolled Oats | 90g | 45g | 23g |
| Almond Flour | 96g | 48g | 24g |
| Coconut Flour | 112g | 56g | 28g |
The Best Investment: If you’re serious about baking accuracy, invest in a digital kitchen scale that reads in both grams and ounces. A good scale costs between $10-$25 and will last for years. Once you start weighing your ingredients, you’ll wonder how you ever baked without one. Many experienced bakers consider a kitchen scale the single most important tool in their kitchen—more important than a stand mixer, a food processor, or even a good oven.
When to Use Which System
The honest answer? Use whatever system the recipe was written in. If you’re following an American recipe, use cups. If you’re following a British or Australian recipe, use grams. Converting between systems introduces rounding errors and potential confusion.
However, if you find a recipe you love that’s only written in cups and you want more precision, use the conversion tables above to weigh your ingredients instead. Many modern recipe websites now include a toggle button that switches between volume and weight measurements—look for these when available.
For cooking (not baking), the measurement system matters less because you’re generally not dealing with chemical reactions that require precise ratios. A “handful of spinach” or “a glug of olive oil” works just fine for most savory cooking. But for baking, precision is everything, and using the right system makes all the difference.
Materials Deep Dive: Choosing the Right Measuring Cup for Your Kitchen
The material of your measuring cup affects not just its durability and appearance, but also its accuracy, ease of use, and even the flavor of your food. Let’s explore each material in depth.
Stainless Steel: The Professional’s Choice
Stainless steel measuring cups are the gold standard for serious bakers, and for good reason. They’re incredibly durable, won’t stain or absorb odors, are dishwasher safe, and can last a lifetime with proper care. But not all stainless steel is created equal.
Understanding Stainless Steel Grades: The numbers you see (18/8, 18/10, 200 series) refer to the chromium and nickel content. The first number is chromium (which provides rust resistance) and the second is nickel (which adds shine and additional corrosion resistance). For measuring cups, 18/8 or 18/10 stainless steel is ideal—it’s food-safe, won’t react with acidic ingredients, and resists denting and bending.
Single-Piece vs. Welded Construction: This is a crucial distinction. Cheaper stainless steel cups have handles that are spot-welded onto the cup body. Over time, these welds can weaken and break, especially in the dishwasher. Premium cups like the King Arthur set are made from a single piece of steel—no welds, no weak points. They’re virtually indestructible.
Pros of Stainless Steel:
- Extremely durable and long-lasting
- Won’t stain, warp, or absorb odors
- Dishwasher safe
- Resistant to scratching and denting (with proper gauge)
- Can handle hot ingredients without melting or deforming
- Nests neatly for compact storage
- Won’t react with acidic ingredients (unlike some plastics)
- Professional appearance and feel
Cons of Stainless Steel:
- Higher upfront cost than plastic
- Can be slippery when wet
- Markings may be harder to read on shiny surfaces
- Can get cold in the refrigerator (minor issue)
- Not transparent—can’t see contents from the side
Plastic: Affordable and Functional
Plastic measuring cups have come a long way from the flimsy, easily-stained versions of decades past. Modern BPA-free plastics are durable, lightweight, and often come with clever features that stainless steel can’t match.
Types of Plastic Used:
- Polypropylene (PP): The most common food-safe plastic. It’s durable, heat-resistant (up to about 275°F / 135°C), and generally dishwasher safe. Most quality plastic measuring cups are made from PP.
- Tritan: A newer copolyester that’s crystal-clear, extremely durable, and resistant to staining and odors. It’s more expensive than PP but offers glass-like clarity with plastic’s shatter resistance.
- Silicone: Flexible, heat-resistant, and often collapsible for storage. Silicone cups are great for measuring and pouring, but they can be harder to level accurately because the sides flex.
Pros of Plastic:
- Lightweight and easy to handle
- Often available in fun colors for easy identification
- Many designs include non-slip grips
- Less expensive than stainless steel
- Some designs nest with magnetic handles or snap-together features
- Won’t shatter if dropped
- Often includes uncommon sizes (2/3 cup, 3/4 cup)
Cons of Plastic:
- Can stain from turmeric, tomato sauce, beets, and other strongly pigmented ingredients
- May retain odors from garlic, onions, or strong spices
- Printed markings can fade over time with dishwasher use
- Can warp in high heat (avoid the bottom rack of some dishwashers)
- Can develop static that makes flour cling to the sides
- Less durable long-term than stainless steel
- Not microwave safe (unless specifically labeled)
De-Sticking Flour from Plastic: If flour clings to the inside of your plastic measuring cups due to static, try rubbing a small amount of cooking oil on the inside surface before measuring. The oil neutralizes the static charge and allows the flour to slide out cleanly. Alternatively, lightly mist the inside of the cup with cooking spray.
Glass: The Liquid Measurement Champion
Glass is the material of choice for liquid measuring cups, and there’s excellent reason for that. Its transparency allows you to see the liquid level from any angle, it’s non-porous (so it won’t absorb colors, flavors, or odors), and it’s microwave-safe for melting butter or warming milk.
Types of Glass Used:
- Tempered Glass (Pyrex, Anchor Hocking): Heat-treated to be stronger than regular glass. It can withstand temperature changes (like going from the microwave to the countertop) better than untreated glass, though it’s not thermal-shock-proof. Tempered glass is the standard for quality liquid measuring cups.
- Borosilicate Glass (original Pyrex, some European brands): Even more resistant to thermal shock than tempered soda-lime glass. It can handle extreme temperature changes without cracking. This is the glass used in laboratory beakers and high-end cookware.
- Regular Soda-Lime Glass: Cheaper and more common, but more susceptible to breaking from thermal shock or physical impact. Avoid liquid measuring cups made from this type of glass.
Pros of Glass:
- Transparent—easy to read measurements from any angle
- Non-porous—won’t stain or absorb odors
- Microwave and oven safe (tempered/borosilicate)
- Easy to clean and dishwasher safe
- Won’t react with acidic ingredients
- Professional appearance
- Very stable on countertops (heavy base prevents tipping)
Cons of Glass:
- Can break if dropped (especially on hard surfaces)
- Heavier than plastic or stainless steel
- Not suitable for dry measuring cups (too heavy to nest)
- Can crack from extreme thermal shock (despite being tempered)
- Markings can eventually fade with aggressive dishwasher use
Ceramic: Beautiful but Impractical
Ceramic measuring cups are often sold as decorative kitchen items, and they can look absolutely gorgeous on a shelf. But for serious, everyday use, they have significant drawbacks.
Ceramic is heavy, prone to chipping and cracking, and the glaze can craze (develop tiny cracks) over time, creating places for bacteria to hide. The handles are often thick and uncomfortable, and the cups don’t nest as efficiently as stainless steel or plastic. We recommend ceramic measuring cups as decorative pieces or for occasional light use, but not as your primary measuring tools.
Silicone: The Flexible Alternative
Silicone measuring cups have gained popularity in recent years, particularly collapsible versions that save drawer space. They’re heat-resistant, dishwasher safe, and won’t shatter if dropped. However, their flexibility—which is their main selling point—is also their biggest drawback for precise measurement. The sides can bulge when filled, making it difficult to get an accurate reading. They’re best for casual cooking where exact measurements aren’t critical.
| Material | Best For | Durability | Accuracy | Price Range | Microwave Safe |
|---|---|---|---|---|---|
| Stainless Steel | Dry ingredients | Excellent | Excellent | $$ – $$$ | No |
| Plastic (BPA-free) | Dry ingredients, casual use | Good | Good | $ – $$ | Sometimes |
| Tempered Glass | Liquid ingredients | Very Good | Excellent | $ – $$ | Yes |
| Borosilicate Glass | Liquid ingredients, hot liquids | Excellent | Excellent | $$ – $$$ | Yes |
| Ceramic | Decorative, light use | Fair | Good | $$ – $$$ | Depends |
| Silicone | Casual cooking, travel | Good | Fair | $ – $$ | Yes |
Measuring Cups for Every Diet and Lifestyle
Whether you’re following a specific diet or cooking for someone with dietary restrictions, accurate measuring becomes even more important. When every gram of carbohydrate or protein counts, the right measuring tools and techniques are essential.
Keto and Low-Carb Baking
Keto baking relies heavily on alternative flours (almond flour, coconut flour, flaxseed meal) and sugar substitutes, all of which behave very differently from their conventional counterparts. Almond flour, for instance, is much denser than all-purpose flour—a cup of almond flour weighs about 96 grams compared to 120 grams for AP flour. Coconut flour is even more absorbent, and most keto recipes use far less of it than you’d use regular flour.
Because the margins for error are so much smaller in keto baking (where ratios of fat to protein to fiber are critical for achieving the right texture), we strongly recommend using a digital kitchen scale for all keto baking. Volume measurements simply aren’t reliable enough when you’re working with such different ingredient densities.
Gluten-Free Baking
Gluten-free flours (rice flour, tapioca starch, potato starch, xanthan gum) each have their own density and absorption characteristics. A cup of rice flour doesn’t weigh the same as a cup of tapioca starch, and using volume measurements can throw off the balance of your gluten-free recipe. Most gluten-free baking experts recommend weighing ingredients, and many modern gluten-free recipes include weight measurements alongside volume measurements.
If you’re developing your own gluten-free recipes, invest in a good scale and keep a notebook of your measurements. The feedback loop of weighing ingredients, noting results, and adjusting is the fastest path to reliable gluten-free baking.
Vegan Baking
Vegan baking often involves substitutions that change the density of ingredients. Plant-based milks vary in density depending on whether they’re made from almonds, oats, soy, or coconut. Vegan butter substitutes may have different water content than dairy butter. When a vegan recipe calls for “1 cup of plant milk,” using the spoon-and-level approach (for any dry components) and the eye-level reading method for liquids will help ensure consistency.
Sugar-Free and Diabetic-Friendly Baking
Sugar substitutes like erythritol, stevia, and monk fruit are used in much smaller quantities than regular sugar, and their sweetness levels vary dramatically. A recipe calling for “1 cup of erythritol” may produce very different results depending on the brand, because erythritol is about 70% as sweet as sugar while stevia is 200-300 times sweeter. Precise measurement is critical, and using proper measuring spoons for these potent sweeteners is non-negotiable.
Stevia Warning: Never measure stevia with regular measuring spoons designed for larger quantities. A pinch too much can make your recipe inedibly bitter. Use the smallest measuring spoons you have (1/8 teaspoon or 1/4 teaspoon) and level them carefully. Many bakers find that converting to weight (grams) for stevia and other concentrated sweeteners is far more reliable.
Protein-Boosted Baking
With the rise of protein-enriched foods, many bakers are now adding protein powder to their recipes. Protein powder is extremely fine and can compact easily, so a cup of protein powder can vary significantly in weight depending on how it’s scooped. If you’re baking with protein powder, always weigh it rather than using volume measurements. Most protein powders weigh between 30-35 grams per scoop, but this varies by brand and type (whey, casein, plant-based).
Professional and Commercial Grade Measuring Cups
What do professional bakers use, and should you invest in the same tools? Let’s pull back the curtain on commercial kitchen measuring equipment.
NSF-Certified Measuring Cups
NSF International (formerly the National Sanitation Foundation) certifies food service equipment for safety, sanitation, and quality. NSF-certified measuring cups meet strict standards for material safety, cleanability, and durability. They’re required in most commercial kitchens and are a good investment for serious home bakers who want the same quality professionals use.
NSF-certified stainless steel measuring cups are typically made from 304-grade (18/8) stainless steel, have permanently etched markings, and feature sealed seams that prevent bacteria from accumulating in crevices. They’re more expensive than consumer-grade cups, but they’re built to withstand the rigors of commercial use—hundreds of dishwasher cycles, constant handling, and exposure to a wide range of ingredients.
What Professional Bakers Actually Use
Here’s a secret that might surprise you: most professional bakers don’t use measuring cups at all. They use scales. In a professional bakery, recipes are written entirely in weight measurements, and bakers weigh every ingredient on a digital scale. This eliminates all the variables we’ve discussed—scooping technique, air pockets, humidity—and produces perfectly consistent results every time.
However, measuring cups still have their place in professional kitchens. They’re used for quick measurements during prep work, for ingredients that are added in approximate quantities (like water for cleaning), and for liquid measurements where a liquid measuring cup with a spout is more practical than a scale and bowl.
Restaurant Supply Options
If you want to buy professional-grade measuring cups without the professional price tag, look at restaurant supply stores. Brands like Winco, Vollrath, and Update International produce NSF-certified measuring cups at wholesale prices. A set of stainless steel measuring cups from these brands typically costs $15-$30 for a full set—comparable to consumer brands but built to commercial standards.
Where to Buy: WebstaurantStore.com, Katom.com, and Amazon’s restaurant supply section all carry professional-grade measuring cups at competitive prices. You can also check local restaurant supply stores—many sell to the public and offer bulk discounts.
Commercial-Grade Liquid Measuring Cups
Commercial liquid measuring cups are typically made from heavy-duty polycarbonate (like the ones you see in restaurant kitchens) and come in sizes up to 1 gallon. They feature red measurement markings that are printed with special ink resistant to fading, and they have reinforced handles that won’t crack under heavy use. For home use, the 1-quart and 2-quart sizes are most practical.
Space-Saving and Organization Solutions
One of the biggest challenges with measuring cups isn’t using them—it’s storing them. Here are the best solutions for keeping your measuring cups organized and accessible, no matter how much kitchen space you have.
Magnetic Nesting Systems
Magnetic measuring cups (like the OXO set we recommend) are a game-changer for organization. The magnetic handles snap together, keeping the cups neatly nested without a ring or clip. They slide into a drawer as a single unit and stay together without rattling around. This is the cleanest, most elegant solution for drawer storage.
Ring and Clip Systems
The traditional approach—a metal ring or plastic clip that holds the cups together—is simple and effective. Most stainless steel sets come with a ring. The advantage is that all cups stay together and can be hung from a hook. The disadvantage is that removing a single cup requires unclipping the ring, which can be fiddly.
Drawer Organizers
If you prefer to keep your measuring cups in a drawer, a dedicated drawer organizer can be a revelation. Look for organizers with individual compartments sized for measuring cups. Some organizers have adjustable dividers that can be configured to fit your specific set. This keeps cups from rattling around, protects their finish, and makes it easy to grab exactly the size you need.
Wall-Mounted Solutions
For kitchens with limited drawer space, wall-mounted storage is an excellent option. magnetic strips (designed for knives) can hold stainless steel measuring cups, and small hooks or a pegboard can organize both cups and spoons. This also keeps your measuring tools visible and within arm’s reach while you’re working.
Travel and Camping Sets
If you cook while traveling, camping, or in an RV, you need compact, durable measuring tools. Collapsible silicone sets are ideal—they fold flat and take up almost no space. Some travel sets nest inside each other like Russian dolls and include both cups and spoons in a single compact package. Look for sets that include a carrying case or bag for easy packing.
Drawer Hack: Line the bottom of your measuring cup drawer with a non-slip shelf liner. This prevents cups from sliding around, reduces noise, and protects both the cups and the drawer from scratches. It’s a simple trick that makes a surprising difference in daily use.
Digital and Mechanical Measuring Cups: The Tech-Forward Approach
For those who love gadgets or want the ultimate in convenience, there are measuring cups that incorporate technology to make measuring easier and more accurate.
Digital Measuring Cups
Digital measuring cups have a built-in scale that displays the weight of the ingredient as you add it. They combine the convenience of a measuring cup with the accuracy of a scale, which sounds like the best of both worlds. However, in practice, they have some significant limitations.
Pros of Digital Measuring Cups:
- Measure by weight without a separate scale
- Can switch between grams, ounces, and milliliters
- Some models have tare functions for sequential measuring
- Great for recipes that list ingredients by weight
Cons of Digital Measuring Cups:
- Bulkier and heavier than traditional cups
- Require batteries (and batteries die at the worst times)
- Electronic components are vulnerable to water damage
- Most can’t go in the dishwasher
- More expensive than traditional sets
- Accuracy can drift over time and may need recalibration
- Harder to clean around the electronic housing
Our verdict? A separate digital kitchen scale is almost always a better investment. It’s more versatile (you can weigh anything in any container), more durable, easier to clean, and often cheaper than a digital measuring cup. But if you really want an all-in-one solution, a digital measuring cup can work for casual use.
The KitchenArt Adjust-A-Cup: A Mechanical Marvel
We’ve already highlighted the KitchenArt Adjust-A-Cup in our top picks, but it’s worth discussing the adjustable cup concept in more detail. These mechanical measuring cups use a plunger or sliding mechanism to adjust the volume, eliminating the need for multiple cups. They’re particularly useful for:
- Sticky ingredients: The plunger ejects every last bit of honey, peanut butter, or molasses
- Odd measurements: Need 2/3 cup but only have 1/2 and 1/4? An adjustable cup handles it in one tool
- Small kitchens: One tool replaces an entire set of nested cups
- Quick measuring: No need to rummage through a set looking for the right size
The downside is that adjustable cups are generally less accurate than dedicated single-size cups, and the mechanism can be tricky to clean thoroughly. We recommend them as a supplement to (not a replacement for) a traditional set.
Measuring Spoons with Leveling mechanisms
A relatively new innovation is measuring spoons with built-in leveling bars. Instead of using the back of a knife to level off a spoonful of baking powder or salt, you slide a small bar across the top of the spoon. These are especially useful for measuring spoons, where the small size makes traditional leveling awkward. They’re not essential, but they’re a nice convenience for bakers who measure lots of small-quantity ingredients.
The 12 Most Common Measuring Mistakes (and How to Avoid Them)
Even experienced bakers make measuring mistakes from time to time. Here are the most common errors we’ve observed in our testing and in conversations with baking professionals, along with simple fixes for each.
Scooping flour directly from the bag. This compresses the flour and gives you up to 30% more than the recipe intends. Fix: Always use the spoon-and-level method for flour, or better yet, weigh it.
Reading liquid measurements from above. Looking down at the measuring line from an angle makes the reading appear higher than it is. Fix: Place the cup on a flat surface and bend down to eye level.
Using a liquid cup for dry ingredients (or vice versa). Liquid cups have headspace above the measurement line; dry cups are meant to be filled to the brim. Using them interchangeably leads to significant measurement errors. Fix: Own both types and use them for their intended purpose.
Tapping the cup to settle the contents. Tapping or shaking a dry measuring cup compresses the ingredient, giving you more than the recipe calls for. Fix: Fill and level without tapping. Let gravity do the work.
Not leveling off dry ingredients. Leaving a mound of flour on top of the cup gives you more than the recipe intends. Fix: Always sweep across the top with a straight edge.
Using expired baking powder. Baking powder loses its potency over time, especially after opening. If your baking powder is more than 6 months old, it may not leaven properly. Fix: Test it (drop 1/2 tsp into 1/3 cup hot water—it should bubble vigorously) and replace annually.
Measuring honey or syrup without oiling the cup first. Sticky ingredients cling to the cup, and you may lose 10-15% of the measurement. Fix: Coat the cup with cooking spray or oil before measuring, or use the hot water method.
Using measuring spoons from a drawer (not a set). Regular eating spoons are not standardized and can vary significantly in size. Fix: Use dedicated measuring spoons from a quality set.
Not fluffing flour before measuring. Flour settles and compacts in the bag, especially after shipping. If you don’t fluff it first, you’ll get a denser cup. Fix: Always stir flour with a fork before spooning it into the cup.
Measuring over the mixing bowl. If you spill while measuring over the bowl, you can’t easily separate the excess. Fix: Measure over a separate container or the counter, then add to the bowl.
Ignoring the meniscus. When measuring liquids, the surface curves (the meniscus). Reading at the edges instead of the bottom of the curve gives an inaccurate measurement. Fix: Read at eye level at the bottom of the meniscus.
Not checking for calibration. Over time, even good measuring cups can become inaccurate due to warping, denting, or wear. Fix: Periodically check your cups against a known standard. Fill a 1-cup measure with water and weigh it—it should be approximately 236-240 grams.
Measuring Cups vs. Kitchen Scales: When to Use Which
This is one of the most debated topics in the baking world: should you use measuring cups or a kitchen scale? The answer isn’t as simple as “one is always better than the other.” Each has its place, and the best bakers know when to use each tool.
The Case for Kitchen Scales
A kitchen scale eliminates virtually all the variables that make volume measurements unreliable. When you weigh ingredients, you get the exact amount called for in the recipe, regardless of how the flour was packed, how humid the air is, or how old the ingredients are. This consistency is why professional bakers and pastry chefs worldwide use scales exclusively.
When a scale is essential:
- Bread baking (where hydration percentages matter)
- Pastry and laminated doughs (precision is critical)
- Recipes that list ingredients by weight
- Scaling recipes up or down (much easier with weight)
- Keto, gluten-free, or other diet-specific baking
- When you want to convert a volume recipe to weight for consistency
The Case for Measuring Cups
Measuring cups are faster for quick measurements, more intuitive for many home bakers, and perfectly adequate for most cooking (as opposed to baking). If you’re making a stir-fry, measuring cups are fine. If you’re making a simple batch of chocolate chip cookies, measuring cups will work—especially if you use proper technique.
When cups are fine:
- Casual everyday cooking
- Recipes where precision isn’t critical (soups, stews, stir-fries)
- Quick measuring without dirtying a scale and bowl
- Teaching children to cook (cups are more visual and intuitive)
- When the recipe is already written in volume and you trust the source
The Hybrid Approach: Best of Both Worlds
Many experienced home bakers use a hybrid approach: a scale for the main ingredients (flour, sugar, butter) and measuring cups/spoons for smaller quantities (vanilla, salt, baking powder). This gives you the accuracy where it matters most while saving time on the less critical measurements.
| Factor | Measuring Cups | Kitchen Scale |
|---|---|---|
| Accuracy | Variable (depends on technique) | Excellent (within 1 gram) |
| Speed | Faster for quick measurements | Slightly slower (requires taring) |
| Consistency | Varies with technique and conditions | Highly consistent |
| Easy to Learn | Very intuitive | Moderate learning curve |
| Cost | $5-$30 for a set | $10-$50 for a good scale |
| Durability | Very durable (steel/glass) | Moderate (electronics can fail) |
| Best For | Cooking, casual baking | Professional baking, bread, pastry |
Measuring Specific Ingredients: A Comprehensive Reference
Different ingredients require different measuring approaches. Here’s a comprehensive guide to measuring the ingredients that cause the most trouble.
Flour Types and Their Weights
Not all flours weigh the same per cup, and using the wrong type can ruin a recipe. Here’s what you need to know:
- All-Purpose Flour: 120g per cup. The workhorse of baking. Suitable for most cookies, cakes, muffins, and quick breads.
- Bread Flour: 127g per cup. Higher protein content creates more gluten, giving bread its chewy texture. Don’t substitute for AP flour in delicate baked goods.
- Cake Flour: 114g per cup. Lower protein and often bleached, producing a tender, fine crumb. Essential for delicate cakes like angel food and chiffon.
- Whole Wheat Flour: 128g per cup. Heavier and denser than AP flour due to the bran and germ. Often blended with AP flour for better texture.
- Almond Flour: 96g per cup. Much lighter than wheat flour. Common in keto and gluten-free baking.
- Coconut Flour: 112g per cup. Extremely absorbent—most recipes call for much less coconut flour than AP flour, often with extra liquid and eggs.
- Oat Flour: 104g per cup. Can be made by blending rolled oats. Slightly heavier than AP flour.
- Rye Flour: 102g per cup. Denser than AP flour, used in traditional European breads.
- Tapioca Starch: 120g per cup. Very light and fine. Used as a thickener and in gluten-free baking blends.
- Rice Flour: 158g per cup. Heavier than AP flour. Common in Asian cooking and gluten-free baking.
Sweeteners
- Granulated Sugar: 200g per cup. Flow freely and measure easily, but avoid packing.
- Brown Sugar (packed): 220g per cup. Must be firmly packed for accurate measurement. Should hold its shape when turned out of the cup.
- Powdered Sugar: 120g per cup (unsifted). If recipe says “sifted,” sift before measuring for ~100g per cup.
- Honey: 340g per cup. Extremely dense and sticky. Use the oil method for clean release.
- Maple Syrup: 312g per cup. Less dense than honey but still sticky.
- Corn Syrup: 328g per cup. Very sticky. Oil the cup or use the hot water method.
- Molasses: 328g per cup. Thick and sticky. Same treatment as corn syrup.
- Coconut Sugar: 170g per cup. Grainier than regular sugar and doesn’t pack as well.
- Stevia (granulated): Varies by brand. Always check the package for equivalent measurements.
Fats and Dairy
- Butter: 227g per cup (2 sticks). Should be at the temperature specified by the recipe (usually room temp, ~65-68°F).
- Vegetable Oil: 218g per cup. Pour slowly to avoid bubbles that can affect the reading.
- Coconut Oil (solid): 218g per cup. Should be solid but scoopable for volume measurement.
- Milk (whole): 244g per cup. Measure at eye level for accuracy.
- Heavy Cream: 238g per cup. Slightly lighter than milk due to fat content.
- Sour Cream: 230g per cup. Scoop and level rather than pouring.
- Cream Cheese: 227g per cup. Must be softened for accurate volume measurement.
- Yogurt: 245g per cup. Similar to sour cream in consistency.
Cocoa, Spices, and Leaveners
- Unsweetened Cocoa Powder: 85g per cup. Light and dusty—spoon and level for best results.
- Cinnamon: 2.6g per tablespoon. Light and fluffy—don’t pack.
- Baking Powder: 4.6g per teaspoon. Level carefully—too much creates a metallic taste.
- Baking Soda: 4.6g per teaspoon. Level carefully—too much creates a soapy taste.
- Salt (table): 6g per teaspoon. Fine grains pack easily—level and don’t heap.
- Salt (kosher): Varies by brand (Morton vs. Diamond Crystal). Diamond Crystal is about half as dense as Morton, so 1 tsp Morton ≠ 1 tsp Diamond Crystal.
- Vanilla Extract: 4.2g per teaspoon. Liquid—measure at eye level.
The Kosher Salt Trap: This is one of the most common seasoning mistakes in cooking. Diamond Crystal kosher salt and Morton kosher salt have very different densities. If a recipe calls for “1 teaspoon kosher salt” without specifying the brand, the saltiness can vary by 50% or more. When in doubt, taste as you go, and when developing your own recipes, specify the brand.
Altitude Baking: When Your Measurements Need to Change
If you live above 3,000 feet (about 900 meters), the rules of baking change. Lower air pressure at high altitudes causes leavening agents to work more vigorously, liquids to evaporate faster, and sugars to concentrate more quickly. This can result in baked goods that rise too fast and then collapse, or that have a coarse, dry texture.
How Altitude Affects Your Measurements
At high altitude, you generally need to make the following adjustments:
- Reduce leavening: Cut baking powder or baking soda by 1/8 to 1/4 teaspoon per teaspoon called for.
- Increase liquid: Add 1-2 tablespoons of liquid per cup called for to compensate for faster evaporation.
- Reduce sugar: Cut 1-3 tablespoons per cup called for. Sugar weakens cell structure, and at high altitude, this effect is amplified.
- Increase flour: Add 1-4 tablespoons per cup called for to provide more structure.
- Increase oven temperature: Raise by 15-25°F to set the structure faster before the gases escape.
These are general guidelines—the exact adjustments depend on your specific altitude, the recipe, and the ingredient ratios. Above 5,000 feet, adjustments become more significant, and above 7,000 feet, many standard recipes need substantial modification.
High-Altitude Baking Tip: Keep a baking journal. Note what adjustments you made and how the results turned out. Over time, you’ll develop intuition for how your specific altitude affects different types of recipes. Many high-altitude bakers find that recipes written specifically for their elevation (from local cookbooks or altitude-adapted recipe sites) work better than adjusted sea-level recipes.
Measuring Cups Around the World: A Global Perspective
Measurement systems vary around the world, and cooking traditions from different cultures have their own approaches to measuring ingredients. Understanding these differences can help you follow international recipes more successfully.
United States: The Cup System
The US is one of the few countries that still uses cups and tablespoons as its primary kitchen measurement system. The US cup (240 mL) is slightly different from the metric cup (250 mL) used in Australia and other countries. Most American recipes use US customary measurements, but some modern recipes (especially from food bloggers) include both cups and grams.
United Kingdom: A Mixed System
The UK officially uses the metric system, but many older British recipes still use imperial measurements (pints, ounces). The British pint (568 mL) is larger than the US pint (473 mL), and British cups can vary. Many modern British recipes use metric weights (grams) exclusively, which is the recommended approach.
Australia and New Zealand: Metric Standard
Australian and New Zealand recipes almost always use metric measurements (grams, milliliters). The Australian metric cup is 250 mL (slightly larger than the US cup of 240 mL). If you’re converting an American recipe for use in Australia, this small difference can matter—multiply US cup amounts by 1.04 to get the Australian equivalent.
Japan: The Gou System
Traditional Japanese cooking uses the “gou” (合) as a unit of measurement. One gou is approximately 180 mL and was originally the volume of one “go” of rice (about 150g). Modern Japanese recipes often use milliliters and grams, but traditional recipes may still reference gou. A standard Japanese rice measuring cup holds exactly one gou.
India: The Cup and Katori System
Indian cooking uses a mix of metric and traditional measurements. A “cup” in Indian recipes is typically 200-250 mL (depending on the region), and many Indian cooks use a “katori” (small bowl) as their standard measuring vessel. Spice measurements are often given in “teaspoons” and “tablespoons,” but these can vary from Western standards. When following Indian recipes, look for metric equivalents or invest in a set of digital kitchen scales for consistency.
Middle East and North Africa: The Glass System
Many Middle Eastern recipes use a “glass” (koz/kas) as a measurement unit, typically equivalent to about 200 mL. This is roughly equivalent to a small tea glass common in Turkish and Arab households. When translating these recipes, treat the “glass” as approximately 3/4 of a US cup.
Following International Recipes: When cooking from a recipe originating in another country, pay attention to the measurement system used. If the recipe is in metric (grams and milliliters), don’t convert it to cups—the metric measurements are already more precise. If it uses unfamiliar traditional units, search for a conversion chart specific to that cuisine. And when in doubt, a kitchen scale that handles both grams and ounces is the universal translator.
Kids and Measuring: Teaching the Next Generation
Getting kids involved in the kitchen is one of the best ways to teach them math, science, and life skills. And measuring is the perfect entry point—it’s hands-on, it’s visual, and the results are delicious.
Age-Appropriate Measuring Tasks
- Toddlers (2-3): Can help pour pre-measured ingredients into a bowl, push buttons on a timer, and stir with supervision.
- Preschoolers (4-5): Can learn to scoop and level with supervision, count tablespoons, and identify cup sizes.
- Elementary age (6-9): Can measure most dry ingredients independently, read liquid measurements with guidance, and begin to understand fractions through cups (1/4, 1/3, 1/2).
- Tweens (10-12): Can follow recipes independently, use both dry and liquid measuring cups, and begin to understand the relationship between volume and weight.
- Teens (13+): Can handle all measuring tasks, use a kitchen scale, and understand why precision matters in baking.
Fun Measuring Cups for Kids
Kids are more engaged when the tools are fun. Look for measuring cups that feature:
- Bright colors that correspond to sizes (e.g., red = 1 cup, blue = 1/2 cup)
- Animal shapes or character designs
- Large, easy-to-read numbers
- Lightweight plastic that small hands can grip easily
- Silicone cups that won’t shatter if dropped
Teaching Fractions Through Measuring
Measuring cups are one of the best visual tools for teaching fractions. When a child sees that two 1/4 cups equal one 1/2 cup, and that four 1/4 cups equal one full cup, abstract math concepts become concrete and tangible. This hands-on experience with fractions is far more memorable than worksheets.
Kitchen Math Activity: Ask your child: “How many 1/3 cups does it take to fill a 1-cup measure?” Let them experiment and discover the answer (3, with some left over because 1/3 doesn’t divide evenly into 1). This is a fun way to introduce the concept of why some fractions don’t convert cleanly to decimals.
Safety Considerations
- Always supervise young children in the kitchen, especially around hot ovens and sharp tools.
- Teach children to wash their hands before handling food.
- Use plastic or silicone measuring cups for young children to avoid injury from dropped metal or glass cups.
- Teach children to read measurement markings before they start cooking.
- Keep measuring spoons away from very young children who might put them in their mouths.
Eco-Friendly and Sustainable Measuring Cup Options
As sustainability becomes increasingly important to consumers, many kitchen tool manufacturers are responding with eco-friendly options. Here’s what’s available for the environmentally conscious baker.
Bamboo Measuring Cups
Bamboo measuring cups are made from sustainably harvested bamboo, which is one of the fastest-growing plants on earth. Bamboo is naturally antimicrobial, lightweight, and beautiful. However, bamboo measuring cups have some limitations: they can absorb moisture and odors over time, they’re not dishwasher safe (hand wash only), and the markings may be less durable than etched metal. They’re best for light use and for those who prioritize sustainability over maximum durability.
Recycled Stainless Steel
Some manufacturers now produce measuring cups from recycled stainless steel. These cups are functionally identical to those made from virgin steel—same durability, same accuracy, same dishwasher compatibility—but with a lower environmental footprint. Look for brands that specify the percentage of recycled content in their products.
Reducing Waste in the Kitchen
Beyond choosing eco-friendly materials, you can reduce waste by:
- Buying quality that lasts: A single set of durable stainless steel cups that lasts 20 years creates less waste than five sets of cheap plastic cups over the same period.
- Avoiding single-use measures: Instead of using disposable paper or plastic cups for measuring, use reusable measuring cups.
- Buying multi-purpose tools: A good set of measuring cups can also be used for scooping, serving, and even as small mixing bowls.
- Choosing products with minimal packaging: Look for measuring cups that come in recyclable packaging or no packaging at all.
Bioplastic Options
A newer development is measuring cups made from bioplastics—plastics derived from renewable resources like corn starch or sugarcane. These cups look and perform like traditional plastic but are biodegradable or compostable under the right conditions. The technology is still evolving, and current bioplastic cups may not be as durable as traditional BPA-free plastics, but they represent an exciting direction for sustainable kitchen tools.
The Fascinating History of Measuring Cups
The measuring cup as we know it today is a surprisingly recent invention. For most of human history, cooking measurements were imprecise and regional—a “handful,” a “pinch,” a “cup” that varied from household to household.
Before Standardization
Before the 19th century, recipes rarely included precise measurements. Cookbooks listed ingredients with vague quantities: “a good quantity of flour,” “enough butter to moisten,” “a tea cup of sugar.” Every household had its own cups, bowls, and spoons, and “a cup” meant whatever cup you happened to have. This worked because cooking was passed down through generations by demonstration, and experienced cooks intuitively knew the right proportions.
The Birth of the Measuring Cup
The modern measuring cup was invented in 1896 by Fanny Farmer, the director of the Boston Cooking-School. Farmer was frustrated by the inconsistency of recipes that used vague measurements, and she championed the idea of standardized measuring cups and spoons. Her cookbook, “The Boston Cooking-School Cook Book,” was the first to include level measurements, and it revolutionized American cooking.
Farmer’s original measuring cups were made of glass and had markings for cups and fractions of cups. Her approach was initially met with resistance from cooks who were used to the old ways, but the consistency of results won people over. By the early 1900s, standardized measuring cups were common in American kitchens.
The Standardization of the Cup
The US legally defined the measuring cup in 1893 at the World’s Columbian Exposition in Chicago, where it was established as exactly 236.588 milliliters (approximately 8 fluid ounces). This standardization meant that a recipe written in one kitchen could be followed exactly in another—a revolutionary concept at the time.
The Evolution of Materials
Early measuring cups were made of glass and ceramic. Stainless steel measuring cups became popular in the mid-20th century, offering durability that glass couldn’t match. Plastic measuring cups arrived in the 1960s and 1970s, bringing affordability and new design possibilities. Today’s market offers everything from bamboo to silicone to digital measuring cups, but the fundamental design—a container with markings indicating volume—has remained remarkably stable for over a century.
The Metric Revolution
While the United States clings to its cup system, most of the world has moved to metric measurements for cooking. The metric system’s base-10 structure and the use of weight (grams) rather than volume (cups) make it inherently more precise. The global trend toward weight-based recipes continues to grow, driven by food blogs and cookbooks from around the world. Many American food writers now include both cup and gram measurements in their recipes, acknowledging the advantages of both systems.
Cleaning, Care, and Maintenance: Making Your Measuring Cups Last
A good set of measuring cups can last decades with proper care. Here’s how to keep your cups in top condition, organized by material.
Stainless Steel Care
- Dishwasher: Most stainless steel cups are dishwasher safe. Place them on the top rack to avoid the harsh jets on the bottom.
- Hand washing: For best results and to prevent water spots, hand wash with warm soapy water and dry immediately.
- Removing water spots: If water spots develop, wipe with a cloth dampened with white vinegar, then rinse and dry.
- Removing stuck-on food: Soak in warm soapy water for 15 minutes, then scrub with a non-abrasive sponge.
- Preventing rust: While high-quality stainless steel is virtually rust-proof, lower-grade steel can rust if left wet. Always dry thoroughly after washing.
- Storage: Nest cups loosely to prevent scratching. If you stack them tightly, place a paper towel between each cup.
Plastic Care
- Dishwasher: Top rack only, low-heat setting if available. Bottom-rack heat can warp plastic.
- Stain removal: For turmeric, tomato, or beet stains, make a paste of baking soda and water. Apply to the stain, let sit for 30 minutes, then scrub and rinse.
- Odor removal: Fill the cup with a solution of 1 tablespoon baking soda per cup of water. Let sit overnight, then rinse.
- Avoid harsh chemicals: Bleach and abrasive cleaners can damage plastic and cause cloudiness.
- Check for warping: Over time, plastic cups can warp. Place them on a flat surface periodically to check. If they wobble, it’s time to replace them.
Glass Care
- Dishwasher: Top rack recommended. Place cups away from other items to prevent chipping.
- Thermal shock: Don’t move a hot glass cup directly to cold water or vice versa. Let it cool or warm gradually.
- Chips and cracks: Inspect glass cups regularly for chips or cracks. A chipped cup can harbor bacteria and should be replaced.
- Marking preservation: If markings begin to fade, avoid abrasive scrubbing. Use a soft sponge and gentle dish soap.
- Storage: Store upright or nest with a cloth between cups to prevent chipping.
General Maintenance Tips
- Periodic accuracy check: Once a year, verify your measuring cups by filling a 1-cup measure with water and weighing it. It should read approximately 236-240 grams. If it’s significantly off, the cup may be warped.
- Inspect markings: Faded or worn markings make cups unreliable. If you can’t read the measurements, it’s time for a new set.
- Check handles: For cups with welded handles, periodically check for looseness or wobbling. A loose handle is a safety hazard and should be addressed.
- Replace when needed: Even the best measuring cups don’t last forever. If a cup is warped, stained, cracked, or has illegible markings, replace it rather than guessing at measurements.
Kitchen Organization: Making Measuring Cups Accessible
The best measuring cup in the world is useless if you can’t find it when you need it. Here are detailed strategies for keeping your measuring tools organized and accessible.
The Drawer Method
The most common storage method is keeping measuring cups in a kitchen drawer. For this to work well:
- Use a drawer organizer with dedicated compartments for each cup size.
- Place cups in order of size (largest to smallest or vice versa) for quick identification.
- Line the drawer with non-slip shelf liner to prevent cups from sliding and rattling.
- Keep measuring spoons in a separate compartment or attached to their ring.
- Consider magnetic cups (like OXO) that snap together and stay organized without a ring.
The Hanging Method
If drawer space is limited, hanging your measuring cups keeps them visible and accessible:
- Install small hooks on the inside of a cabinet door.
- Use a magnetic knife strip to hold stainless steel cups.
- Hang cups from a pegboard for a customizable, visually appealing storage solution.
- Use S-hooks on a pot rack for a professional kitchen look.
The Container Method
Store measuring cups in a container on the counter or in a cabinet:
- A large mason jar or crock can hold a nested set of cups.
- A small basket or bin works well for drawer or shelf storage.
- A canvas tool roll (like those for paintbrushes) can hold measuring spoons and cups for travel.
Separating Dry and Liquid Sets
Keep your dry measuring cups and liquid measuring cups in different locations. Dry cups live in a drawer; liquid cups can sit on the counter, in a cabinet, or stacked near the stove. This separation reinforces the habit of using the right cup for the right purpose and prevents confusion during busy cooking sessions.
Holiday Baking: When Measuring Precision Matters Most
The holidays are when many home bakers tackle their most ambitious projects—cookies, pies, breads, cakes, and candies in quantities that stretch both their skills and their measuring tools. Here’s how to ensure your holiday baking goes smoothly.
Scaling Recipes for Large Batches
When you’re making 6 dozen cookies instead of 2 dozen, measuring errors get multiplied. A 10% error in a single batch becomes a much bigger problem when you’re scaling up. This is one of the best times to use a kitchen scale—weighing 360 grams of flour (3 cups × 120g) is more reliable than measuring 3 cups three times and hoping each one is consistent.
Common Holiday Baking Ingredients
Holiday baking often involves ingredients that are particularly tricky to measure:
- Molasses: Common in gingerbread and spice cookies. Use the oil method for clean release.
- Corn syrup: Used in pecan pie and candy making. Very sticky—oil the cup.
- Ground spices: Holiday baking uses a lot of cinnamon, nutmeg, cloves, and ginger. Measure carefully—too much can overpower a recipe.
- Nuts: Chopped nuts vary in density depending on how finely they’re chopped. Measure by weight for consistency.
- Dried fruit: Raisins, cranberries, and chopped dates can clump together. Fluff them before measuring.
Prep Ahead Tips
- Pre-measure dry ingredients for each recipe into separate bowls or bags. Label them clearly.
- Soften butter to room temperature well in advance (it takes 30-60 minutes on the counter).
- Bring eggs to room temperature by placing them in warm water for 10 minutes.
- Have all measuring tools clean, dry, and ready before you start.
Batch Baking Strategy: If you’re making multiple types of cookies, measure all the dry ingredients for all recipes first, then measure wet ingredients as needed. This reduces cleanup and ensures you don’t run out of a key ingredient mid-bake. Keep a checklist to track which recipes are done and which are still in progress.
Troubleshooting Guide: When Measurements Go Wrong
Even with the best tools and techniques, things can go wrong. Here’s a diagnostic guide to help you identify and fix measurement-related baking problems.
| Problem | Likely Cause | Fix |
|---|---|---|
| Cookie dough spreads too much | Too much butter or sugar; not enough flour | Measure butter by weight; use spoon-and-level for flour |
| Cookies are too thick/cakey | Too much flour | Use spoon-and-level method or weigh flour |
| Cake sinks in the middle | Too much sugar, not enough flour, or too much leavening | Measure all ingredients precisely; check baking powder freshness |
| Bread doesn’t rise | Too much salt (kills yeast), water too hot (kills yeast), or old yeast | Measure salt carefully; check water temp (100-110°F); test yeast |
| Bread rises too fast, then collapses | Too much yeast or sugar, or high altitude without adjustments | Measure yeast by weight; reduce sugar slightly at altitude |
| Brownies are dry | Too much flour | Use spoon-and-level method; reduce flour by 2 tbsp |
| Brownies are greasy | Too much butter or oil | Measure fat by weight or use level measuring cup |
| Pie crust is tough | Too much flour or overmixing | Measure flour carefully; don’t pack it into the cup |
| Pie crust shrinks | Too much liquid or flour | Add liquid a tablespoon at a time; measure flour accurately |
| Muffins have tunnels/holes | Too much flour or overmixing | Measure flour carefully; mix until just combined |
| Muffins are dense | Too much flour or not enough leavening | Use spoon-and-level; check baking powder freshness |
| Cake is too salty | Used table salt when recipe called for kosher (or vice versa) | Know the difference; use the specified type |
| Candy won’t set | Not enough sugar or too much liquid (inaccurate measuring) | Measure sugar and liquid by weight for candy making |
| Frosting is too runny | Too much liquid (milk, cream, or vanilla) | Add liquid a teaspoon at a time; measure precisely |
| Frosting is too stiff | Not enough liquid or too much powdered sugar | Add liquid gradually; measure powdered sugar accurately |
Expert Tips and Tricks from Professional Bakers
We’ve gathered tips from professional bakers, pastry chefs, and cookbook authors to help you take your measuring skills to the next level.
Tip 1: Weigh Your Empty Cups. If you’re serious about accuracy, weigh each of your dry measuring cups when empty and note the weight. This lets you tare them on a scale for even more precise measurements. Some bakers mark this weight inside each cup with a permanent marker.
Tip 2: The “Two-Spoon” Method for Nut Butters. When measuring peanut butter or almond butter, use two measuring spoons. Scoop with one, then use the second to scrape the nut butter into the cup. This gives you a cleaner, more accurate measurement with less mess.
Tip 3: Chill Your Measuring Cup for Butter. If a recipe calls for cold butter cut into pieces, chill your measuring cup in the freezer for 5 minutes before measuring. This keeps the butter cold while you work, which is important for pie crusts and flaky pastries.
Tip 4: Measure Over Parchment Paper. When measuring dry ingredients, place a sheet of parchment paper under your measuring cup. Any spills land on the paper, which you can then funnel back into the container. This reduces waste and keeps your workspace clean.
Tip 5: Use a Bench Scraper for Leveling. A bench scraper (also called a dough scraper) is wider and more rigid than a knife, making it a better tool for leveling off measuring cups. One sweep across the top gives you a perfectly flat surface.
Tip 6: The Freezer Trick for Sticky Ingredients. Place your measuring cup in the freezer for 10 minutes before measuring honey, corn syrup, or molasses. The cold surface reduces sticking and allows the ingredient to slide out more easily.
Tip 7: Measure Salt Separately. Never measure salt directly into your mixing bowl. Measure it into a small dish first, then add it to the recipe. This prevents accidents where too much salt falls in and ruins the entire batch.
Tip 8: Keep a Conversion Chart Handy. Tape a measurement conversion chart to the inside of a cabinet door or keep one on your phone. Quick reference prevents errors when converting between systems.
Tip 9: The “Dip and Sweep” for Cocoa Powder. Cocoa powder is notoriously difficult to measure because it’s so fine and dusty. Use the dip-and-sweep method: dip the cup into the cocoa, lift it out, and sweep across the top with a straight edge. Don’t try to spoon it—it creates too much dust.
Tip 10: Room Temperature Matters. Ingredients measured at different temperatures can have different volumes. Butter measured when cold has a different volume than butter measured when softened. For the most consistent results, bring ingredients to the temperature specified in the recipe before measuring.
A Deep Dive: What to Look for in a Great Set of Measuring Cups
Choosing a set of measuring cups might seem simple, but several key factors separate the great from the mediocre. Here’s the detailed criteria we used in our testing, which you can use as your own personal buying guide.
1. Material: The Great Debate
The material of your measuring cup affects its durability, longevity, and even accuracy.
- Stainless Steel: The professional’s choice. It’s incredibly durable, won’t stain or absorb odors, is dishwasher safe, and lasts a lifetime. Look for heavy-gauge (18/8 or 18/10) steel, which resists bending and denting. The best stainless steel cups are made from a single piece of metal to eliminate weak points.
- Plastic: Lightweight and inexpensive, plastic is a popular choice. Modern sets are BPA-free and often come with handy features like non-slip grips. However, plastic can warp in high heat (be careful in the dishwasher), stain easily, and may retain odors from strong ingredients. They can also develop a static charge that makes flour cling.
- Glass: The go-to for liquid measuring cups. Its main advantages are transparency (so you can see the liquid level) and the fact that it’s microwave-safe. It’s non-reactive and easy to clean, but it can break if dropped and is too heavy for a nested set of dry cups.
- Ceramic: Aesthetically pleasing and often found in decorative sets. While beautiful, ceramic is heavy and prone to chipping and breaking. We generally don’t recommend it for serious, everyday use.
2. Accuracy: The Most Important Factor
A measuring cup is useless if it’s not accurate. Unfortunately, there’s a surprising amount of variation between brands. We tested accuracy using a calibrated digital kitchen scale, measuring the weight of water (since 1 cup of water should weigh approximately 236 grams). The best sets were consistently within 1-2% of the correct weight. When shopping, look for brands known for their precision, like those we’ve recommended.
3. Design and Features
Good design makes a tool a pleasure to use.
- Markings: Etched or stamped markings are far superior to printed ones, which will inevitably fade and wear off over time. Markings should be clear, easy to read, and include both US customary units and milliliters.
- Handles: Handles should be sturdy and comfortable to hold. On stainless steel sets, ensure they are securely attached or, even better, part of a single-piece construction. Some plastic sets offer ergonomic, non-slip grips.
- Rims and Spouts: For dry cups, the rim should be perfectly flat and smooth to allow for easy and accurate leveling. For liquid cups, a well-designed spout is crucial for a clean, drip-free pour.
- Nesting & Storage: Most dry sets are designed to nest. Look for sets that fit together snugly to save drawer space. Features like magnetic handles (like the OXO set) or a removable ring are excellent for keeping things organized.
4. Included Sizes
A standard set includes 1/4, 1/3, 1/2, and 1 cup. But some recipes call for less common sizes like 2/3 or 3/4 cup. Sets that include these sizes (like the OXO) save you from awkward combinations like 1/2 + 1/4 to make 3/4 cup. Consider what sizes you use most often and choose a set that includes them.
5. Price and Value
Measuring cups range from under $10 for basic plastic sets to over $40 for premium stainless steel. The best value depends on how often you bake and what you’re looking for. A $15 plastic set that lasts 5 years is a better value than a $5 set that warps after 6 months. For serious bakers, a $30 stainless steel set that lasts a lifetime is the ultimate value.
At a Glance: Comparison of Top Measuring Cups
| Product | Type | Material | Key Feature | Best For |
|---|---|---|---|---|
| King Arthur Stainless Steel | Dry | 18/8 Stainless Steel | Unmatched accuracy & one-piece build | Serious Bakers |
| Pyrex Glass Set | Liquid | Tempered Glass | Microwave/Oven safe & durability | Every Kitchen |
| OXO Good Grips Plastic | Dry | BPA-Free Plastic | Magnetic handles & extra sizes | Budget & Convenience |
| KitchenArt Adjust-A-Cup | Dry & Liquid | Plastic | Space-saving & great for sticky items | Small Kitchens |
Expanded Comparison: More Options for Every Need
While our top four picks represent the best overall options, there are many other measuring cup sets worth considering depending on your specific needs. Here’s a broader comparison to help you find your perfect match.
| Feature | Best Budget | Best Mid-Range | Best Premium | Best Specialty |
|---|---|---|---|---|
| Category | Plastic Sets | Stainless Steel (Standard) | Stainless Steel (Heavy-Duty) | Adjustable/Collapsible |
| Price Range | $5 – $15 | $15 – $25 | $25 – $45 | $10 – $30 |
| Material | BPA-Free Plastic | Standard Stainless Steel | 18/8 or 18/10 Stainless Steel | Plastic, Silicone, or Metal |
| Durability | Good (2-5 years) | Very Good (5-10 years) | Excellent (Lifetime) | Fair to Good |
| Accuracy | Good | Very Good | Excellent | Fair to Good |
| Dishwasher Safe | Top rack only | Yes | Yes | Varies |
| Markings | Printed | Stamped | Etched | Printed or Molded |
| Nesting | Good | Good | Excellent | Folds flat or adjusts |
| Best For | Students, beginners | Everyday bakers | Serious bakers, professionals | Travel, small spaces |
| Warranty | Limited (1-2 years) | Limited (2-5 years) | Lifetime | Limited (1 year) |
Color-Coded Measuring Cup Sets
Some manufacturers offer color-coded measuring cups where each size has a distinct color (e.g., 1 cup = red, 1/2 cup = blue, 1/3 cup = yellow, 1/4 cup = green). This visual system makes it easy to grab the right size at a glance, which is especially helpful when you’re working quickly or teaching kids to bake. The colors are typically molded into the plastic, so they won’t fade over time.
Double-Sided Measuring Cups
Double-sided measuring cups feature two different measurements in a single cup—for example, 1/4 cup on one end and 1/3 cup on the other. This reduces the total number of cups you need and can be a space-saver. However, the design can be confusing (which end is which?), and the cups may not nest as neatly as traditional sets.
Measuring Cup Sets with Built-In Levelers
Some sets include a built-in leveling tool that slides along the rim of the cup. This eliminates the need for a separate knife and ensures a perfectly level measurement every time. While this feature isn’t essential, it’s a nice convenience for bakers who measure lots of dry ingredients.
Frequently Asked Questions (FAQ)
Can I use dry measuring cups for liquids (and vice-versa)?
While you technically can, you absolutely shouldn’t. The reasoning lies in how they are designed to be measured. A dry cup is accurate only when filled to the brim and leveled. If you try to fill a 1-cup dry measure with water, the surface tension will create a dome (meniscus) above the rim, leading to an over-measurement. It’s also very easy to spill. Conversely, a liquid measuring cup has headspace above the measurement line. It’s impossible to accurately “level off” a scoop of flour in a liquid cup, which will almost always result in using too much flour and getting dense, dry baked goods. For best results, own and use both types.
Are expensive measuring cups really worth it?
It depends on your needs. For a professional or an avid home baker, the answer is a resounding yes. A high-end set like the King Arthur cups offers superior accuracy and will last a lifetime, making it a better long-term investment than repeatedly buying cheap sets that break or fade. The heavy-duty construction also feels better and more stable in the hand. For a casual cook or someone on a tight budget, a well-designed plastic set like the OXO provides more than enough accuracy and functionality for most recipes.
Why are my baked goods still coming out inconsistent?
If you’re using accurate measuring cups and still getting inconsistent results, the problem is likely your technique or the nature of volume measurements themselves. The density of flour, for example, can vary significantly depending on how it’s packed. This is why most professional bakers and serious home bakers use weight, not volume. Investing in a simple digital kitchen scale is the single biggest step you can take toward baking consistency. 120 grams of flour is always 120 grams, no matter how you scoop it.
How should I clean my measuring cups?
Most stainless steel, glass, and modern plastic measuring cups are dishwasher safe (usually top-rack recommended for plastic). However, to preserve the life of the markings, especially printed ones, hand-washing is always the gentlest option. For stainless steel, this can also prevent water spots. Always ensure cups are completely dry before nesting them for storage to prevent any moisture from being trapped.
What is the difference between US cups and metric cups?
A US customary cup holds 236.588 mL (approximately 8 US fluid ounces), while an Australian/UK metric cup holds 250 mL. The difference is small (about 5.7 mL or roughly 1 teaspoon) but can add up over multiple measurements. Most American recipes use US cups, while Australian, New Zealand, and many British recipes use metric cups. If you’re converting between the two, multiply US cup amounts by 1.05 to get metric equivalents.
Should I measure flour before or after sifting?
It depends on how the recipe is written. “1 cup sifted flour” means sift the flour first, then measure—this gives you about 100 grams per cup. “1 cup flour, sifted” means measure first, then sift—this gives you about 120 grams per cup. The order matters significantly. Most modern recipes that call for sifted flour specify the order. When in doubt, check the recipe’s context—if it’s a delicate cake that needs a light texture, it probably means sift first.
How do I measure flour without it sticking to the cup?
Flour sticks to measuring cups (especially plastic ones) due to static electricity. To prevent this, you can: (1) lightly coat the inside of the cup with cooking spray before measuring, (2) rub a tiny amount of vegetable oil on the inside surface, (3) use the spoon-and-level method which minimizes contact with the cup sides, or (4) switch to a stainless steel cup, which is less prone to static buildup than plastic.
Can I use a regular drinking glass as a liquid measuring cup?
While you can pour liquid into a drinking glass, it’s not recommended for accurate measuring. Regular drinking glasses don’t have measurement markings, their shapes vary widely (a tall thin glass and a short wide glass can hold the same volume), and they don’t have pour spouts. A proper liquid measuring cup with clear markings, a flat bottom, and a spout is a small investment that makes a big difference in accuracy.
Why do some recipes use grams and others use cups?
Recipes use different measurement systems based on their origin and target audience. American recipes traditionally use cups and tablespoons, while European, Australian, and Asian recipes typically use grams and milliliters. Weight-based measurements (grams) are more precise because they’re not affected by how an ingredient is scooped or how much air is trapped in it. Many modern food bloggers now include both systems to accommodate all readers. If a recipe only lists cups, you can use conversion charts to find the equivalent weight.
Do measuring cups expire or become inaccurate over time?
Measuring cups don’t “expire” like food, but they can become less accurate over time. Plastic cups can warp from heat exposure, stainless steel cups can dent, and glass cups can chip. Printed markings can fade, making cups hard to read. To check accuracy, fill a 1-cup measure with water and weigh it—it should be approximately 236-240 grams. If it’s significantly off, the cup may be warped and should be replaced. A yearly accuracy check is good practice.
What size measuring cups should a beginner own?
A beginner should own a basic set of dry measuring cups (1/4, 1/3, 1/2, and 1 cup) and a liquid measuring cup (1-cup or 2-cup size). This covers the vast majority of recipes. As you bake more, you can add specialty sizes (2/3 cup, 3/4 cup), a larger liquid measuring cup (4-cup), and a kitchen scale for the ultimate in precision.
Why does my cookie recipe say “1 cup packed brown sugar”?
Brown sugar contains molasses, which makes it moist and sticky. When you scoop it into a measuring cup, it naturally contains air pockets. “Packed” means you should press the sugar firmly into the cup to eliminate those air pockets. A properly packed cup of brown sugar weighs about 220 grams, while an unpacked cup might weigh only 180 grams. That 40-gram difference is significant enough to change the texture and flavor of your cookies. Always pack brown sugar unless the recipe specifically says “loosely packed.”
How many measuring cups should I own?
For most home bakers, two sets of dry measuring cups and two liquid measuring cups are ideal—one set for daily use and one for when the first set is dirty. However, even one good set of each is sufficient if you wash between measurements. The key is having the sizes you need: at minimum, a dry set (1/4, 1/3, 1/2, 1 cup) and a liquid cup (at least 2-cup capacity).
Is it worth buying measuring cups that include 2/3 and 3/4 cup sizes?
Absolutely, especially if you bake frequently. Many recipes call for 2/3 or 3/4 cup, and without those sizes, you have to awkwardly combine smaller cups (1/2 + 1/6 for 2/3, or 1/2 + 1/4 for 3/4). Having dedicated 2/3 and 3/4 cup measures is faster, cleaner, and more accurate. The OXO set includes these sizes, which is one reason it’s our top budget pick.
What’s the best way to measure a small amount of a strong ingredient like cayenne pepper?
For potent ingredients like cayenne pepper, clove, or cardamom, use the smallest measuring spoon you have (1/8 teaspoon or even a pinch). Measure over a separate small dish rather than directly into your mixing bowl—this way, if you accidentally add too much, you can discard the excess without ruining the entire recipe. When in doubt, start with less and add more to taste. A tiny amount of a strong spice can make or break a dish.
Can I convert any recipe from cups to grams?
Yes, you can convert any recipe from volume (cups) to weight (grams) using conversion charts like the ones in this guide. However, the conversion depends on the specific ingredient—1 cup of flour weighs differently than 1 cup of sugar. Use ingredient-specific conversion tables for the most accurate results. Many recipe websites and apps now offer automatic conversion features. For the best accuracy, always use weight measurements when available.
Why do professional recipes almost never use cups?
Professional kitchens prioritize consistency above all else. A recipe that needs to produce the same result hundreds of times per day, regardless of who’s making it, requires precise measurements. Weight-based measurements eliminate the variables that affect volume measurements (scooping technique, humidity, ingredient density). Professional recipes are also often scaled up or down for different batch sizes, which is much easier with weight measurements. In professional settings, “1 cup” is simply too imprecise for reliable results.
Our Final Verdict
A reliable set of measuring cups is a fundamental kitchen investment that pays dividends in every meal you prepare. While there are countless options on the market, our rigorous testing proves that you don’t need to spend a fortune to get a great set, but investing in quality can provide a lifetime of accurate, enjoyable use.
For the absolute best performance for dry ingredients, the King Arthur Stainless Steel Measuring Cups are in a class of their own. Their bulletproof construction and unwavering accuracy make them the top choice for anyone who takes baking seriously.
For liquids, the classic Pyrex 3-Piece Set remains the undefeated champion. Its versatility, durability, and value are simply unmatched.
For those on a budget who don’t want to compromise on smart design, the OXO Good Grips Plastic Set offers exceptional value with its magnetic handles, bonus sizes, and included leveler.
And for tight spaces and sticky ingredients, the clever KitchenArt Adjust-A-Cup proves that great things really do come in small packages.
But remember: the best measuring cup in the world is only as good as the technique used to fill it. Whether you choose volume or weight, stainless steel or glass, take the time to learn proper measuring methods. Fluff your flour, read at eye level, pack your brown sugar, and invest in a digital kitchen scale for ultimate precision.
Baking is both a science and an art. The science is in the measurements—the art is in everything else. Get the measurements right, and you’ve laid the foundation for every delicious creation that follows.
Ultimately, the right choice depends on your specific needs, cooking style, and budget. By understanding the key factors of material, accuracy, and design—and by mastering the techniques we’ve outlined in this guide—you can confidently select a set that will become a trusted partner in your kitchen adventures for years to come.


