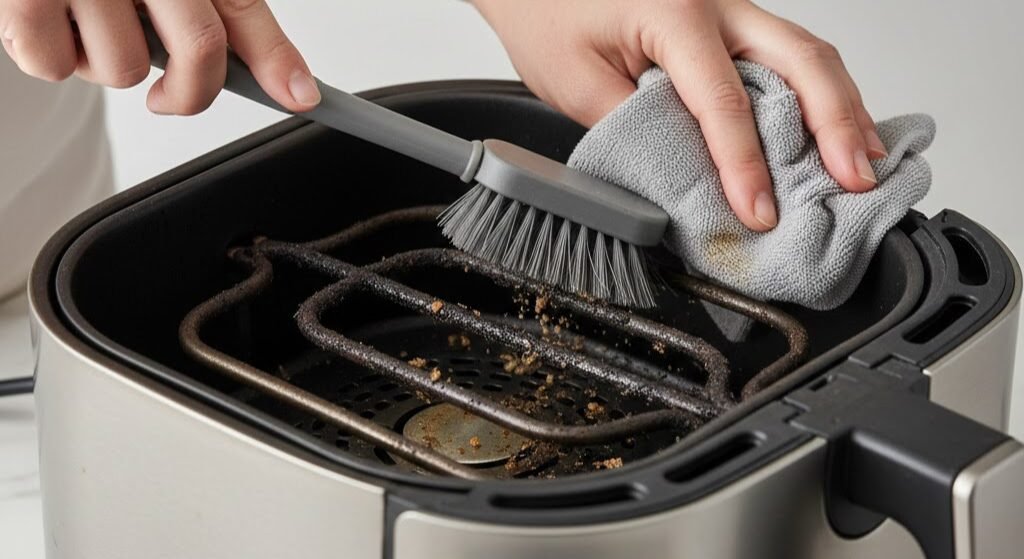
Mastering the Deep Clean: How to Clean an Air Fryer Heating Element Like a Pro
Tired of your air fryer smoking and ruining the flavor of your food? Discover the safe, step-by-step method to degrease your heating coil without damaging your appliance.
1. The Hidden Culprit of Air Fryer Smoke
We’ve all been there. You load up your favorite basket air fryer with a batch of perfectly seasoned chicken wings or fresh-cut potato wedges. You set the timer, walk away, and five minutes later, your kitchen looks like a foggy London morning. The smoke alarms are blaring, and worse, your food has taken on an acrid, bitter, burnt flavor.
You pull out the basket, scrub the non-stick grate until it shines, and try again the next day—only to be met with the exact same cloud of noxious white smoke. What gives?
The problem isn’t your cooking, and it isn’t the basket. You are dealing with the most neglected part of the appliance: the heating element. Learning exactly how to clean an air fryer heating element is the secret separator between amateur cooks who replace their appliances every year and seasoned kitchen pros whose machines run flawlessly for a decade.
Because the heating coil sits stealthily tucked away in the “ceiling” of the cooking chamber, it falls into the category of out of sight, out of mind. Yet, this delicate metallic spiral is the beating heart of your appliance. In this ultimate, comprehensive guide, we will break down the exact science, the safety protocols, and the most effective techniques to resurrect a grease-choked heating element back to factory-fresh condition.
This guide has grown considerably since our first pass at the subject, largely because reader questions kept surfacing gaps we hadn’t originally covered. People wanted brand-specific advice for their Ninja, Cosori, Instant Pot, and Philips units. They wanted to know whether an air fryer smell means the appliance is dying or simply needs a wash. They wanted a printable maintenance calendar, a clear-eyed cost comparison between cleaning and replacing, and a rundown of which “natural” cleaning hacks are legitimate versus which are internet folklore. We’ve folded all of that into the sections below, so consider this the definitive, single-page reference for keeping the heart of your air fryer in peak condition for years.
2. Appliance Anatomy: Why Does the Heating Element Get So Dirty?
To understand how to clean it, you must first understand how an air fryer actually works. Despite the name, an air fryer does not “fry” anything. It is, essentially, a highly compact, turbocharged convection oven.
Right above the food basket sits a thick, coiled metal heating element (similar to what you see at the bottom of a traditional electric oven, or inside a toaster). Above that element is a powerful, high-speed fan. When you turn the machine on, the element generates intense infrared heat, and the fan drives that heat downward in a rapid vortex around your food. This aggressive airflow is what creates the famous, crispy Maillard reaction on your food without the need for deep frying.
When grease hits a 400°F (200°C) metal coil, it instantly bakes on, polymerizing into a hard, sticky, carbonized resin. Over weeks of cooking burgers, bacon, and sausages, layer upon layer of this resin builds up. Eventually, the element becomes completely coated in a thick, black crust. The next time you turn the unit on, the machine isn’t just cooking your food—it is actively burning the old grease permanently attached to the coil, resulting in a kitchen full of foul-smelling smoke.
If you are struggling with different colors of smoke and aren’t sure if it’s grease or a mechanical failure, we highly recommend reading our detailed guide on air fryer smoking diagnosis: white, black, and blue smoke explained.
Why This Differs From a Standard Oven
A conventional wall oven has far more internal volume, which means grease particles disperse across a much larger surface area before they ever reach a heating element. An air fryer’s cooking chamber is tiny by comparison — often just a few liters — and the fan sits inches from the food. That proximity is exactly what gives an air fryer its speed and crispness advantage, but it is also why the coil gets dirty so much faster than an oven’s broil element ever would. Understanding this trade-off helps explain why air fryer manufacturers recommend far more frequent interior cleaning than oven manufacturers do.
The Role of Food Type in Buildup Speed
Not all foods contribute equally to heating element grime. Fatty proteins — bacon, chicken thighs with skin on, sausages, burgers — are the worst offenders because they render substantial liquid fat during cooking. Breaded items, particularly anything coated in a wet batter, also throw off starchy particulate that can combine with grease to form an especially stubborn, glue-like residue. Vegetables, by contrast, are relatively low-risk; a batch of air-fried broccoli or Brussels sprouts contributes only trace amounts of buildup. If you regularly rotate high-fat proteins through your air fryer, you should expect to clean the heating element roughly twice as often as someone who mostly cooks vegetables and frozen fries.
3. Safety First: The Pre-Cleaning Protocol
Before you even think about reaching for a sponge, we need to establish the ground rules of appliance maintenance. An air fryer is a high-wattage electrical device. The heating element is directly wired into the internal motherboard and temperature sensors. One wrong move can result in permanent damage, voided warranties, or severe electrical shock.
The Pre-Wash Checklist:
- Unplug the Unit: Do not just press the power button to turn off the digital display. Physically remove the plug from the wall socket.
- Achieve Total Cool Down: If you have recently used the air fryer, leave the basket open and allow the machine to sit for an absolute minimum of 45 to 60 minutes. The heating coil holds residual heat for a shockingly long time.
- Remove the Basket and Drip Tray: Take out all removable parts. Wash these separately in the sink with warm, soapy water. This gives you clear, unobstructed access to the interior cavity of the main unit.
- Invert the Machine: Gently turn the main unit upside down. Place a soft microfiber towel on your countertop to protect the glossy digital display or the top of the housing from getting scratched. Looking down into the inverted unit is the only way to get a clear, ergonomic view of the heating element and the fan behind it.
For a broader overview of how to handle electrical appliances in your kitchen safely, review our air fryer safety checklist covering fire, smoke, and electrical overload.
Working Environment Considerations
Where you clean matters almost as much as how you clean. Choose a well-lit, well-ventilated spot — ideally near a window or under a range hood — since you will be working with fine baking soda dust and possibly mild acidic solutions. Lay down two layers of towel: a thicker terry cloth towel on the bottom to cushion the unit, and a lighter microfiber layer on top to prevent lint transfer onto the display. Keep a headlamp or a small flashlight nearby; overhead kitchen lighting rarely reaches deep enough into an inverted cavity to show you exactly where grease has accumulated behind the coil.
Protecting Your Hands and Countertops
While baking soda paste is non-toxic, repeated exposure can dry out skin, so a pair of thin nitrile gloves is a reasonable precaution if you have sensitive skin or are doing a deep clean that will take an hour or more. Also consider placing a silicone mat or a spare cutting board under the towel if your countertop is natural stone; while unlikely, dripping soapy water can occasionally dull certain stone sealants over time with repeated exposure.

Upgrade Your Cleaning Arsenal
Stop struggling with old sponges. Invest in a dedicated Air Fryer Soft-Bristle Cleaning Brush Set. Designed specifically to reach behind the delicate heating coil and fan blades without scratching the non-stick coating.
View Cleaning Sets on Amazon4. The Safe Arsenal: Tools and Supplies You Actually Need
The biggest mistake consumers make when figuring out how to clean an air fryer heating element is using the wrong chemicals. The interior cavity of an air fryer is a high-heat, food-contact zone. Using commercial oven cleaners, heavy-duty degreasers, or bleach is highly dangerous. These chemicals can seep into the metal or the fan motor, and when the unit heats up, they will off-gas toxic fumes directly into your next meal.
Furthermore, abrasive tools will scratch the delicate anti-corrosion coating on the heating element and the non-stick walls of the cavity, leading to irreversible rust.
What You Need (The Approved List):
- Baking Soda (Sodium Bicarbonate): The undisputed king of appliance cleaning. It acts as a natural, non-toxic abrasive that cuts through polymerized grease without scratching metal.
- Dawn Dish Soap (or similar grease-cutting liquid): Excellent for breaking down fresh, surface-level oils.
- Warm Water: To activate the baking soda and soap.
- Soft-Bristled Brushes: A clean, unused soft toothbrush is the absolute best tool for getting behind the coil. Specialized air fryer fan cleaning sets are also phenomenal.
- Microfiber Cloths: Far superior to paper towels, which tend to shred and leave lint behind the coil.
- Wooden Skewers or Toothpicks: Essential for carefully dislodging stubborn, burnt-on food particles stuck in the corners where the coil meets the wall.
| Safe to Use ✅ | NEVER Use ❌ | Why to Avoid |
|---|---|---|
| Baking Soda Paste | Easy-Off / Commercial Oven Cleaner | Leaves toxic chemical residue; creates noxious fumes when heated. |
| Soft Toothbrush | Steel Wool / Wire Brushes | Will scratch the element coating, exposing bare metal to rust and failure. |
| Damp Microfiber Cloth | Soaking Wet Sponges | Dripping water can enter the fan motor housing and short out the motherboard. |
| White Vinegar | Bleach or Ammonia | Highly toxic in high-heat environments; degrades internal plastics. |
Building a Dedicated Air Fryer Cleaning Kit
If you own an air fryer long-term, it is worth assembling a small dedicated kit rather than borrowing tools from your general kitchen cleaning caddy every time. A shoebox-sized container stocked with a box of baking soda, a bottle of plain white vinegar, two or three soft-bristled brushes of different sizes, a stack of microfiber cloths reserved only for appliance interiors, a handful of wooden skewers, and a small flashlight will turn a dreaded chore into a five-minute grab-and-go task. Label the container clearly so cleaning cloths never accidentally get used for countertops where they might pick up other grease or chemical residue.
Optional But Helpful Extras
- A turkey baster or small squeeze bottle: Useful for precisely applying small amounts of water or vinegar solution without oversaturating the cavity.
- Cotton swabs: Great for very tight gaps around sensors or where the coil mounts to the housing wall.
- A small handheld vacuum with a brush attachment: Helpful for sucking up loose crumbs and dried baking soda dust before you do your final wipe-down, reducing the number of passes needed.
- pH-neutral dish soap: Some heavily fragranced or antibacterial dish soaps contain additives that can leave a filmy residue on hot metal; a plain, pH-neutral option is gentler for repeated appliance use.
5. Step-by-Step: The Light Maintenance Wipe (Do This Every 3 Weeks)
If you are diligent, you will rarely need to perform a grueling deep clean. By implementing a “Light Maintenance Wipe” every few weeks, you prevent the grease from baking into a hardened resin. This process takes less than 5 minutes.
- Prep the Unit: Ensure it is unplugged, cooled, and inverted on a towel as described in the safety section.
- Create a Soap Solution: In a small bowl, mix warm water with a few drops of a high-quality grease-cutting dish soap (like Dawn).
- Dampen the Cloth: Dip your microfiber cloth into the soapy water. Crucial step: Wring the cloth out aggressively. It should be barely damp, not dripping. You do not want water running down into the fan motor.
- Wipe the Coil: Gently wipe the exposed face of the heating coil. Use a light touch. Do not press hard enough to bend or warp the metal coil, as displacing it can affect the precision of your air fryer’s temperature control.
- Clean Behind the Coil: Take your soft toothbrush, dip it lightly in the soapy water, tap off the excess, and gently brush the top side (the side facing the fan) of the coil.
- The Final Wipe: Take a second, clean microfiber cloth dampened only with plain water to wipe away the soap residue. Finally, use a dry cloth to pat the element completely dry.
Why the Light Wipe Is the Single Most Valuable Habit
If there is one habit that will save you the most time and frustration over the life of your air fryer, it is this five-minute wipe. Grease that is a few days old is still soft, water-soluble, and easy to lift with a barely-damp cloth. Grease that has been baked on repeatedly over several weeks polymerizes into a hard, plastic-like resin that requires far more aggressive scrubbing, longer soak times, and more elbow grease to remove. In practical terms, five minutes every three weeks saves you roughly an hour of scrubbing every few months. Treat it the same way you treat wiping down your stovetop after cooking — a small, consistent effort that prevents a much larger one later.
6. Step-by-Step: The Baking Soda Deep Clean (For Heavy Grease)
If your air fryer is billowing smoke like a chimney, a damp cloth isn’t going to cut it. The grease has polymerized, forming a hard, carbonized shell around the element. It is time to bring in the heavy artillery: the Baking Soda Paste method.
Baking soda is alkaline, which means it excels at breaking down acidic grease and organic compounds. When mixed into a paste, it clings to the coil, giving it time to dissolve the baked-on grime.
The Deep Clean Procedure:
- Make the Paste: In a small bowl, mix approximately 3 tablespoons of baking soda with 1 tablespoon of warm water. Stir until it forms a thick paste, roughly the consistency of toothpaste. If it’s too runny, add more baking soda. If it’s too crumbly, add a few drops of water.
- Apply the Paste: With your air fryer unplugged, cooled, and inverted, use your soft toothbrush to generously apply the paste directly onto the heating element. Ensure you coat the front, sides, and use the bristles to push the paste onto the back of the coil. Avoid getting large globs of paste directly onto the fan blades if possible, though a little bit won’t hurt.
- Let It Sit (The Magic Step): This is where patience is required. Let the baking soda paste sit on the coil for at least 1 to 2 hours. If the buildup is exceptionally bad, you can leave it overnight. The alkaline mixture needs time to chemically break the bonds of the carbonized grease.
- Scrub the Grime: After the waiting period, take your soft toothbrush (slightly dampened) and begin scrubbing the coil. You will see the white paste turn brown or black as it lifts the baked-on grease away from the metal. Work methodically around the entire spiral.
- Detailed Extraction: If there are large chunks of carbonized food stuck between the coil and the wall, use a wooden skewer to gently pry them loose. Do not use a metal knife.
- The Great Wipe Down: Once the grease is lifted, you must remove all the baking soda residue. Take a microfiber cloth, dampen it with plain warm water, wring it out completely, and carefully wipe the coil clean. You may need to rinse the cloth and repeat this step 3 or 4 times to get all the gritty residue off.
- Dry Completely: Use a dry cloth to dab the element and surrounding area. Leave the unit sitting open and inverted for at least an hour to air dry completely before using it.
Reading the Signs: How Dirty Is Too Dirty?
Not every air fryer needs the full two-hour treatment. A light gray or slightly yellow tint on the coil usually responds well to the standard light wipe. A dull, sticky brown coating that feels tacky to the touch means it’s time for the baking soda paste, with a one-hour sit time. A thick, flaking, matte-black crust that has visibly changed the shape of the coil’s surface calls for the overnight soak, and possibly two rounds of scrubbing. If, after two full deep-clean attempts, the coil still looks charred and uneven, you may be dealing with damage rather than dirt — at that point it is worth contacting the manufacturer rather than continuing to scrub.
Common Mistakes During the Deep Clean
- Rushing the soak time: Scrubbing after only 10–15 minutes rarely lifts anything more than surface grime; the alkaline reaction needs real time to work.
- Using too much water: A soaked cloth, rather than a wrung-out one, is the single most common cause of post-cleaning electrical issues.
- Skipping the rinse cycle: Leaving baking soda residue behind is what causes the “worse smoke than before” complaint covered later in the troubleshooting section.
- Forcing the coil: Pressing too hard while scrubbing can bend or misalign the coil, which in turn affects even heat distribution during cooking.

Tough on Grease, Safe on Food
If you don’t want to mix your own paste, check out these highly-rated, plant-based, non-toxic appliance degreasers. Formulated without harsh chemicals, they are perfect for food-contact surfaces like air fryer coils and oven interiors.
Shop Natural Degreasers7. The Lemon-Steam Hack: Work Smarter, Not Harder
If the idea of scrubbing a dry, encrusted heating coil sounds miserable, you can use the machine’s own mechanics to do half the work for you. This is known as the “Steam Hack,” and it is highly effective for softening grease before you attempt the baking soda scrub.
Why the Steam Hack Works
By placing water in the basket and turning the machine on, the high-speed fan circulates hot steam throughout the cavity. The steam rehydrates the hard, baked-on grease, making it pliable. Adding lemon juice or white vinegar introduces a mild acid that further cuts through the lipids and neutralizes foul odors.
A Word of Caution
You must not use too much water, and you must not let the machine run too long, or you risk boiling the water violently into the fan motor. Follow the exact measurements below.
How to Execute the Steam Hack:
- Take your empty air fryer basket and pour in 3 to 4 tablespoons of water. (Just enough to coat the bottom, no more).
- Add 1 tablespoon of lemon juice or white vinegar to the water.
- Insert the basket into the air fryer.
- Turn the air fryer on and set the temperature to 400°F (200°C) for exactly 4 to 5 minutes.
- When the timer goes off, do not open the basket immediately. Let it sit closed for another 10 minutes so the steam remains trapped inside, softening the grime.
- Unplug the unit, remove the basket (dump the dirty water), invert the machine, and immediately begin your wipe down while the grease is still soft and pliable.
Variations on the Steam Hack
Some readers have had success swapping lemon juice for a small splash of white vinegar when citrus isn’t on hand, since both introduce a similar mild acidity. Others add a pinch of baking soda directly to the steaming water for a combined acid-alkaline effect, though this is optional and mostly helps with odor rather than grease-cutting power. Whichever variation you choose, the core mechanism is the same: warm moisture loosens the bond between grease and metal so your subsequent scrub requires far less force.
When to Skip the Steam Hack
If your air fryer has a persistent grinding noise, an intermittent power issue, or any sign of prior water intrusion, do not run the steam hack until the underlying mechanical issue is resolved. Introducing additional moisture into a unit that already has electrical concerns is not worth the convenience. In these cases, stick to the manual baking soda paste method described in the previous section, which involves no operation of the appliance at all.
8. Red Flags: What NEVER to Use on the Heating Element
We cannot stress this enough: the heating element is the most sensitive part of the appliance. A mistake here will ruin your machine. If you are ever in doubt, remember these absolute “Do Nots”:
- NEVER submerge the main unit in water. The basket and crisper plate are dishwasher safe; the main housing, which contains the motherboard, digital display, and wiring, is not. Submerging it is a fatal error.
- NEVER use abrasive scouring pads. Things like Brillo pads, SOS pads, or the rough green side of a heavy-duty sponge will strip the dark protective coating off the element. Once bare metal is exposed to the high heat and moisture of cooking, it will rust rapidly.
- NEVER use a dripping wet sponge. Gravity works against you when the machine is upright. If you squeeze a wet sponge against the ceiling of the unit, water will drip into the fan motor bearings and short out the circuitry. Always use a damp, heavily wrung-out cloth.
- NEVER ignore a distinct plastic smell. If you clean the element and still smell burning, it might not be grease. Sometimes, internal wire casing or plastic housing begins to melt due to manufacturer defects. Learn to tell the difference by reading our guide on air fryer burning plastic smells vs. grease.
Additional Substances to Keep Away From the Coil
- Rubbing alcohol or acetone-based cleaners: These can degrade certain plastic and rubber components near the coil mount and are not formulated for food-contact zones.
- Undiluted, full-strength vinegar left standing for long periods: While a mild vinegar solution used briefly (as in the steam hack) is fine, prolonged exposure to concentrated acid can dull certain metal coatings over months of repeated use.
- Cooking sprays applied directly into the cavity to “season” it: Some users mistakenly spray oil into the empty chamber, thinking it will create a non-stick effect. This does the opposite — it adds another layer of grease directly onto the coil.
- Compressed air canisters: Blasting compressed air at the coil can dislodge dust into the fan motor rather than out of the unit, and the propellant residue itself can leave a film on hot metal.
9. Troubleshooting Post-Cleaning Issues
You spent an hour meticulously cleaning the heating element. It looks brand new. But when you plug it back in, something is wrong. Here is how to troubleshoot common post-cleaning issues:
Issue 1: The Air Fryer Smokes Worse Than Before!
The Cause: You likely left baking soda or soap residue on the heating element. As the element reaches 400°F, that chemical residue is burning off.
The Fix: Unplug the unit, let it cool, and do another highly thorough wipe down with a damp cloth to remove the invisible residue. Once clean, run the air fryer empty at 400°F outside or under an exhaust hood for 10 minutes to safely “burn off” any remaining traces before cooking food.
Issue 2: The Fan is Making a Grinding Noise
The Cause: During the cleaning process, you may have pushed a chunk of hardened grease up into the fan blade cavity, or you accidentally bent the thin metal fan guard/coil so that it is now scraping against the rotating blades.
The Fix: Unplug and invert the unit. Shine a flashlight behind the coil. Use a wooden skewer to clear out any dislodged debris blocking the fan. Gently check that the heating coil has not been pushed upward into the path of the fan. If your fan has stopped entirely, consult our guide on diagnosing an air fryer fan that won’t spin.
Issue 3: The Unit Won’t Turn On at All
The Cause: Moisture likely entered the safety switch mechanism or the internal motherboard during the cleaning process.
The Fix: Do not attempt to use it. Leave the unit unplugged in a dry, well-ventilated area for 24 to 48 hours to allow any internal moisture to evaporate completely. If it still fails to turn on, the internal fuse may have blown, requiring professional repair or replacement.
Issue 4: Uneven Cooking or Slower Preheating After Cleaning
The Cause: Vigorous scrubbing can occasionally shift the coil slightly out of its original position, altering the distance between the element and the fan, which affects how heat circulates.
The Fix: Visually compare the coil’s position to photos you may have taken before cleaning (a good habit to adopt going forward), or consult your model’s manual for the correct coil clearance. In most cases, gently repositioning the coil by hand while the unit is unplugged resolves the issue. If cooking times remain noticeably off after several uses, contact the manufacturer.
Issue 5: A Faint Chemical or “New Appliance” Smell Persists
The Cause: This is usually residual moisture evaporating combined with trace cleaning agents, and it typically resolves within one to two cooking cycles.
The Fix: Run two or three empty cycles at a moderate temperature (around 350°F) with the window open or the range hood on. If the smell hasn’t diminished by the third cycle, revisit your cleaning process to ensure no residue was left behind, as described in Issue 1.
10. Prevention Strategies: Keep the Element Clean Forever
Now that you know how to clean an air fryer heating element, your primary goal should be avoiding the need to do it again anytime soon. By tweaking how you cook, you can drastically reduce the amount of grease that reaches the ceiling of the appliance.
- Avoid High-Smoke Point Oils in Aerosol Cans: Commercial non-stick sprays (like PAM) contain propellants (like soy lecithin) that cause terrible, sticky buildup on both your basket and your heating element. Instead, invest in a reusable glass oil spritzer and fill it with a high-quality, high smoke point oil like Avocado or Light Olive Oil. Read more about the best oils for crispy, smoke-free air frying.
- Never Overfill the Basket: When you cram too much food into the basket, the food sits physically closer to the heating element. This proximity means splattering grease has a much shorter distance to travel, guaranteeing it hits the coil. Cook in smaller, single-layer batches.
- Use a Splatter Guard (Carefully): Some modern air fryers come with removable mesh splatter guards that sit below the element. If yours doesn’t, you can place a lightweight stainless steel trivet or mesh screen over high-fat foods (like bacon or burgers) to catch the grease before it flies upward. Warning: Never use loose aluminum foil or parchment paper as a cover; the fan will suck it directly into the heating element, causing a severe fire hazard. Always understand safe air fryer liner materials before modifying your setup.
- Add Bread or Water for Fatty Foods: When cooking extremely greasy foods (like a ribeye steak or bacon), place a slice of plain bread or two tablespoons of water in the very bottom of the drawer (underneath the crisper plate). The bread will soak up the dripping fat, or the water will prevent the drippings from smoking, reducing the overall volatile grease circulating in the air chamber.
Choosing Lower-Fat Cooking Methods When Possible
Trimming visible fat from proteins before cooking, patting marinated items dry to remove excess oil, and choosing leaner cuts when the recipe allows can meaningfully cut down on the grease load your heating element has to deal with. This doesn’t mean giving up bacon or wings — it simply means being mindful that every gram of rendered fat is a gram that potentially ends up on the coil.
Perforated Parchment Liners: A Safer Alternative
Unlike loose foil, purpose-made perforated parchment liners are designed with airflow holes that let hot air circulate while catching some drips. They are far lighter than foil and, when properly sized to sit flat in the basket, are much less likely to be pulled upward into the fan. Always confirm any liner you use is rated for your air fryer’s maximum temperature, and never use a liner larger than the basket itself.
Positioning and Batch Size
Beyond simply avoiding overfilling, consider the shape of what you’re cooking. Round or irregularly shaped foods roll and shift during the cooking cycle, sometimes ending up closer to the element than they started. Flatter, more uniform items (like fries or nuggets) tend to stay put. If you frequently cook items prone to shifting, check on them halfway through the cycle and reposition as needed to keep splatter predictable and contained.
11. Brand-Specific Cleaning Notes
While the core baking soda method applies universally, small design differences between popular air fryer brands mean the exact access point, coil shape, and disassembly steps can vary. Here is a quick reference for the most common brands on the market.
Ninja Air Fryers (Basket and Oven-Style Models)
Ninja’s basket-style units typically have a fixed, non-removable heating element mounted flush against the lid, which means you will almost always be working with the unit inverted. Ninja’s larger oven-style models, by contrast, often have a front-opening door that lets you access the top heating element without flipping the entire appliance — simply open the door fully and work from the front with a flashlight angled upward.
Cosori Air Fryers
Many Cosori models feature a slightly recessed element with a narrow gap between the coil and the housing wall, which tends to trap more grease along the edges than other brands. Pay extra attention to this perimeter gap during your deep clean, using a wooden skewer wrapped in a thin layer of microfiber cloth to reach into the recess without scratching the housing.
Instant Pot Air Fryer Combos and Lids
Instant Pot’s air fryer lids attach to a separate pot base, and the heating element is housed entirely within the lid itself. Never submerge the lid in water under any circumstances, since it contains all of the unit’s electronics. Clean it using the same inverted, damp-cloth approach described in this guide, propping the lid on a towel rather than resting it directly on the counter.
Philips Airfryer (Twin TurboStar and Similar)
Philips units are known for a slightly deeper cooking chamber, which gives you a bit more working room when scrubbing but also means the coil sits farther from the opening. A longer-handled soft brush is particularly useful here to reach the back of the element without straining your wrist.
Toaster Oven / Air Fryer Combo Units
Combo units that function as both a toaster oven and an air fryer typically have a top and sometimes a bottom heating element, both exposed and visible when the door is open. These are actually easier to clean than basket-style units since you don’t need to invert the appliance at all — simply open the door, let it cool, and apply the same baking soda paste method directly with the unit sitting upright on the counter.
Regardless of brand, always cross-reference brand-specific guidance with your model’s printed manual before deep cleaning, since some manufacturers void warranties if unauthorized cleaning methods are used on internal components.
12. Killing Lingering Smells & Odor Removal
Even after a thorough grease removal, some air fryers retain a faint smell — often described as fishy, smoky, or plasticky — that lingers into the next few cooking cycles. This section focuses specifically on smell rather than visible grime.
Why Smells Linger Even After Cleaning
Odor compounds from cooking fish, curry, or heavily spiced foods can absorb into the microscopic pores of the metal coil and the surrounding plastic housing, even when no visible residue remains. Unlike grease, these odor molecules aren’t always removed by a simple wipe-down; they often need to be neutralized rather than scrubbed away.
The Baking Soda Sit Method for Odor
After your unit is fully cleaned and dry, place an open, shallow bowl containing a quarter cup of dry baking soda inside the closed cooking chamber (not in contact with the coil) and leave it overnight with the appliance unplugged. Baking soda is highly effective at absorbing airborne odor molecules over several hours, similar to how it’s used to deodorize refrigerators.
The Citrus Burn-Off Cycle
For a faster fix, place a few thin lemon or orange peels (no juice, just the dry peel) directly in the basket and run the air fryer empty at 300°F for 5 minutes. The gentle heat releases citrus oils into the chamber, which can mask and partially neutralize lingering odors. Let the unit cool fully afterward and wipe out any peel residue.
Coffee Grounds as a Natural Deodorizer
Dry, unused coffee grounds placed in a small open container inside the (unplugged, cool) chamber overnight can also absorb strong odors, particularly smoky or fishy smells. This is a well-known trick in commercial kitchens for deodorizing enclosed spaces and works just as well in a home air fryer.
When Smell Indicates a Problem, Not Just Residue
If a burning-plastic or acrid chemical smell persists after multiple cleaning and airing-out attempts, this is different from ordinary food odor and should not be treated with deodorizing tricks. Refer back to the troubleshooting section and our dedicated guide on distinguishing plastic off-gassing from grease odor before continuing to use the unit.
13. The Complete Maintenance Schedule
Consistency is more valuable than intensity when it comes to air fryer care. Below is a suggested cadence based on typical usage patterns.
| Usage Frequency | Light Wipe (Coil) | Deep Clean (Baking Soda) | Basket & Tray Wash |
|---|---|---|---|
| Light (1–2x per week) | Every 4–6 weeks | Every 4–6 months | After every use |
| Moderate (3–5x per week) | Every 3 weeks | Every 2–3 months | After every use |
| Heavy (daily use) | Every 1–2 weeks | Monthly | After every use |
| Very heavy (multiple daily uses, high-fat cooking) | Weekly | Every 2–3 weeks | After every use |
Building a Simple Cleaning Log
A quick note on your phone or a sticky note on the appliance itself — just the date of the last light wipe and last deep clean — removes the guesswork of “was that three weeks ago or six?” Many readers find that a simple recurring reminder on their phone calendar, set for the frequency that matches their table row above, is enough to keep the habit consistent without becoming a chore they dread.
Adjusting the Schedule Seasonally
Cooking habits often shift with the seasons — more frozen fries and quick snacks in summer, more roasts, wings, and holiday appetizers in colder months. If your household tends to cook heavier, fattier foods during the winter holiday season, consider temporarily shifting to the “heavy use” row of the table above for a few months, then relaxing back to your normal schedule afterward.
14. Myth-Busting: Air Fryer Cleaning Misconceptions
Myth: “A self-cleaning cycle will handle the heating element.”
Very few consumer air fryers include a true self-cleaning cycle for the heating element itself; most “self-clean” buttons simply run an empty high-heat cycle to help dry out the basket, not to remove grease from the coil. Manual cleaning remains necessary regardless of what buttons your model offers.
Myth: “If it still cooks food fine, the element doesn’t need cleaning.”
An air fryer can continue to function and cook food while the heating element is significantly caked in grease. Performance degradation is often gradual and easy to miss — slightly longer preheat times, slightly less crispy results — until the buildup is severe enough to cause visible smoke.
Myth: “Vinegar alone will dissolve baked-on grease.”
Vinegar is a mild acid, effective for softening fresh grease and neutralizing odor, but it is not strong enough on its own to break down heavily polymerized, carbonized buildup. It works best as a pre-softening step (as in the steam hack) rather than a standalone deep-cleaning agent.
Myth: “Running it empty at high heat will burn off the grease safely.”
This is one of the more dangerous myths in circulation. Intentionally running an air fryer empty at maximum temperature to “burn off” heavy grease buildup can produce dense smoke, trigger smoke alarms, and in cases of very heavy buildup, poses a genuine fire risk. Manual cleaning is always the safer approach; an empty burn-off cycle should only ever be used briefly, at moderate heat, to clear trace residue after a proper cleaning — never as a substitute for cleaning.
Myth: “All air fryer smells mean something is broken.”
A faint “new appliance” smell in the first few uses, or a mild food odor after cooking something pungent, is normal and not indicative of a defect. Persistent acrid, chemical, or burning-plastic smells are the ones that warrant concern, as detailed in the troubleshooting and odor sections above.
15. Cleaning vs. Replacing: A Cost Breakdown
A common question from readers dealing with a heavily neglected air fryer is whether it’s even worth the effort to clean, versus simply replacing the unit. Here’s a practical breakdown.
| Factor | Cleaning | Replacing |
|---|---|---|
| Typical Cost | Under $10 in baking soda, dish soap, and basic tools (often already owned) | $60–$250+ depending on model and capacity |
| Time Investment | 5 minutes (light wipe) to 2–3 hours (deep clean with soak time) | Research, purchase, unboxing, and disposal of old unit |
| Environmental Impact | Minimal; extends appliance lifespan | Contributes to electronic waste |
| When It Makes Sense | Grease buildup, smoke, odor, minor performance decline | Cracked housing, non-functional heating element after cleaning, persistent electrical faults, or a unit already near the end of its typical 3–5 year lifespan |
In the vast majority of cases — including units that look genuinely alarming with heavy black buildup — a proper deep clean using the baking soda method restores full function at essentially no cost. Replacement should generally be reserved for actual mechanical or electrical failures, not simply for a dirty coil.
16. Eco-Friendly & Non-Toxic Cleaning Options
For households prioritizing non-toxic, low-waste cleaning, the good news is that the most effective method for an air fryer heating element is also one of the most eco-friendly: baking soda and water. Unlike commercial degreasers, it requires no special disposal, contains no petroleum-based surfactants, and is safe around food-contact surfaces by design.
Reducing Waste in Your Cleaning Routine
- Reusable cloths over disposable wipes: A set of dedicated microfiber cloths, washed and reused, eliminates the ongoing waste of disposable cleaning wipes, which are often marketed for “quick” appliance cleaning but generate unnecessary landfill waste.
- Bulk baking soda: Buying baking soda in larger boxes rather than small containers reduces packaging waste over the appliance’s lifetime, especially if you also use it for general kitchen deodorizing.
- Compostable citrus scraps: Lemon or orange peels used in the odor-removal steam or burn-off methods can be composted afterward rather than discarded in general trash.
Evaluating “Natural” Commercial Degreasers
If you prefer a ready-made product over mixing your own paste, look for plant-based degreasers explicitly labeled as safe for food-contact surfaces and free of synthetic fragrance, which can leave a residue that off-gasses at high heat. Always patch-test a small area first and follow the same rinse-and-dry protocol used for the baking soda method.
17. Cleaning for Heavy Users & Small Businesses
Home cooks aren’t the only ones relying on air fryers — small cafes, food trucks, ghost kitchens, and catering operations increasingly use commercial-capacity air fryers for high-volume service. Cleaning demands scale up significantly in these settings.
Commercial-Duty Considerations
In a commercial setting where an air fryer may run for six or more hours a day, the light wipe-down schedule effectively compresses from weeks down to days. Many commercial kitchens build a coil check into their closing checklist, performing a quick visual inspection and light wipe every single night, with a full baking soda deep clean scheduled weekly rather than monthly.
Documentation for Health Code Compliance
Food service operations subject to health inspections should maintain a written cleaning log for all heating appliances, including air fryers, noting the date, the type of clean performed, and who performed it. This is not just good practice — many local health codes require documented cleaning schedules for food-contact equipment, and an air fryer’s heating element, while not in direct food contact, is close enough to the cooking chamber to warrant inclusion in most equipment-cleaning logs.
Staff Training Considerations
Because the safety protocols in this guide (unplugging, full cool-down, avoiding harsh chemicals) are non-negotiable, any staff member responsible for cleaning commercial air fryers should be briefed on these steps specifically, rather than assuming general kitchen cleaning knowledge transfers automatically. A laminated quick-reference card near the equipment, summarizing the light wipe and deep clean steps, can reduce training time and cleaning inconsistencies across shifts.
18. Glossary of Air Fryer Terms
For readers newer to air fryer maintenance, here is a quick reference for terms used throughout this guide.
- Heating Element / Coil: The metal component that generates heat, typically located at the top of the cooking chamber.
- Polymerization: The chemical process by which repeatedly heated grease hardens into a plastic-like, carbonized residue.
- Convection Fan: The high-speed fan that circulates hot air around food, positioned directly behind or above the heating element.
- Crisper Plate: The perforated insert inside the basket that elevates food and allows grease to drip away during cooking.
- Off-Gassing: The release of fumes from a material (often plastic or chemical residue) when heated, distinct from ordinary food-related smoke.
- Splatter Guard: A mesh or perforated barrier placed between food and the heating element to reduce direct grease contact.
- Deep Clean: The more intensive cleaning process, typically involving a baking soda paste and extended soak time, used for heavy buildup.
- Light Maintenance Wipe: A quick, frequent cleaning pass intended to prevent grease from accumulating enough to require a deep clean.
Protect Your Investment and Your Health
Cleaning your air fryer heating element is not just about keeping your kitchen free of embarrassing smoke; it is about extending the lifespan of an expensive appliance and ensuring your food tastes exactly how it should. A pristine heating coil operates more efficiently, reaches target temperatures faster, and produces healthier, better-tasting meals.
Make the “Light Wipe Down” a part of your monthly kitchen routine. Treat your air fryer with the respect it deserves, and it will reward you with years of crispy, golden, guilt-free perfection.
Discover the Top 20 Must-Have Air Fryer Accessories


